• Cookbook
  • About
  • Video
  • Recipes
  • Travel
  • Inspiration
  • Services
  • Contact
Menu

Andrea's Cooktales

Street Address
City, State, Zip
Phone Number
A STORY BEHIND EVERY RECIPE

A STORY BEHIND EVERY RECIPE

Andrea's Cooktales

  • Cookbook
  • About
  • Video
  • Recipes
  • Travel
  • Inspiration
  • Services
  • Contact

Pumpkin & Short Rib Chili

September 17, 2014 tatumletard@gmail.com
chili.jpg
20140917-213314-77594582.jpg

I smelled it today... The smell of fall. All it takes is stepping outside in 60-70 degree weather, a small breeze blowing, pumpkins displayed at markets and grocery stores, and chili in the Crock-Pot. As a young girl, I remember my mom making the best chili ever. Chili always meant fall. Fall is a comin, and while I'm certain there are plenty more chili recipes I'll create this fall, I put a little spin on the typical Crock-Pot chili - pumpkin, short ribs, and Red Gold tomatoes! No matter how you make yours or what recipes you try out, Red Gold tomatoes are THE way to bring out the true flavor of your chili. Sweet, crisp, and fresh, you would never know these tomatoes came directly from a can. The Red Gold Diced tomatoes are perfectly chopped, so all you have to do is dump them into your crock pot - no knife skills necessary! And the Red Gold Petite Diced tomatoes with Green Chilis give your chili a tiny amount of heat without over powering it!

For a rundown of the recipe and complete review of Red Gold tomatoes, watch the video!

Grocery list (4-6 people):

2-3 lbs short ribs

2 bottles pumpkin beer

Kosher salt

Pepper

2 tbsp olive oil

1 large onion - chopped

2 garlic cloves - minced

1 orange bell pepper - chopped

3 chipotle peppers in adobo sauce - chopped 2 tbsp chili powder

1 tbsp cumin

1 tsp oregano

2 tbsp brown sugar

1/4 cup maple syrup

1 (14.5 oz) can of RED GOLD DICED TOMATOES

1 (14.5 oz) can of RED GOLD PETITE DICED TOMATOES WITH GREEN CHILIS

2 cups beef broth

1 can pumpkin purée

1 can black beans - drained 

4 cloves

1 1/4 tsp cinnamon

Green onions - chopped (for garnish)

Sour cream - optional

Directions:

Step 1:

20140917-192947-70187921.jpg
20140917-193032-70232521.jpg

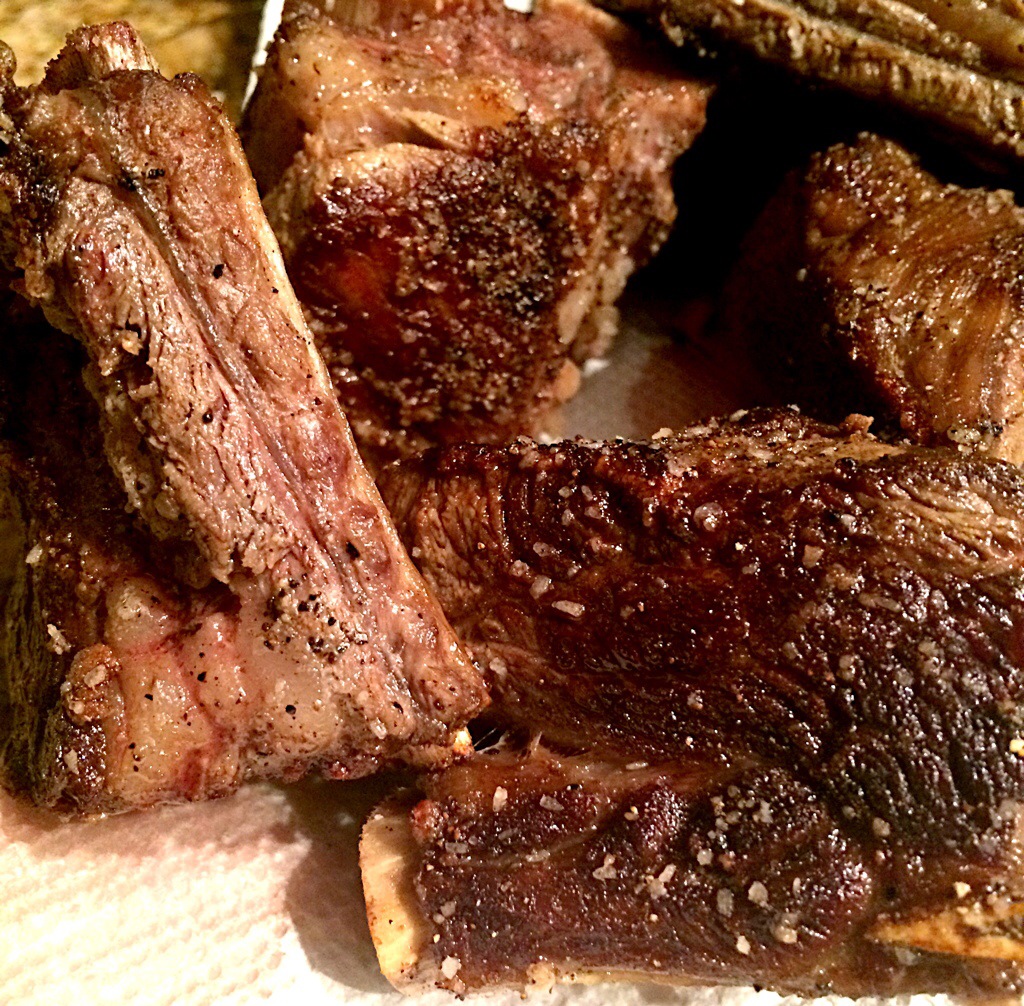
Prepare the ribs (to save time, I do this the night before). In a large pot, combine beers and 2 cups water. Bring to a boil and add short ribs. Simmer and let the ribs sit for 10 minutes. Drain and pat dry to remove some of the fat from the ribs. Heat olive oil in a pot over medium heat. Salt and pepper all sides of the short ribs and brown the ribs in batches - about 5 minutes for each batch. Set ribs aside.

Step 2:

20140917-193121-70281553.jpg

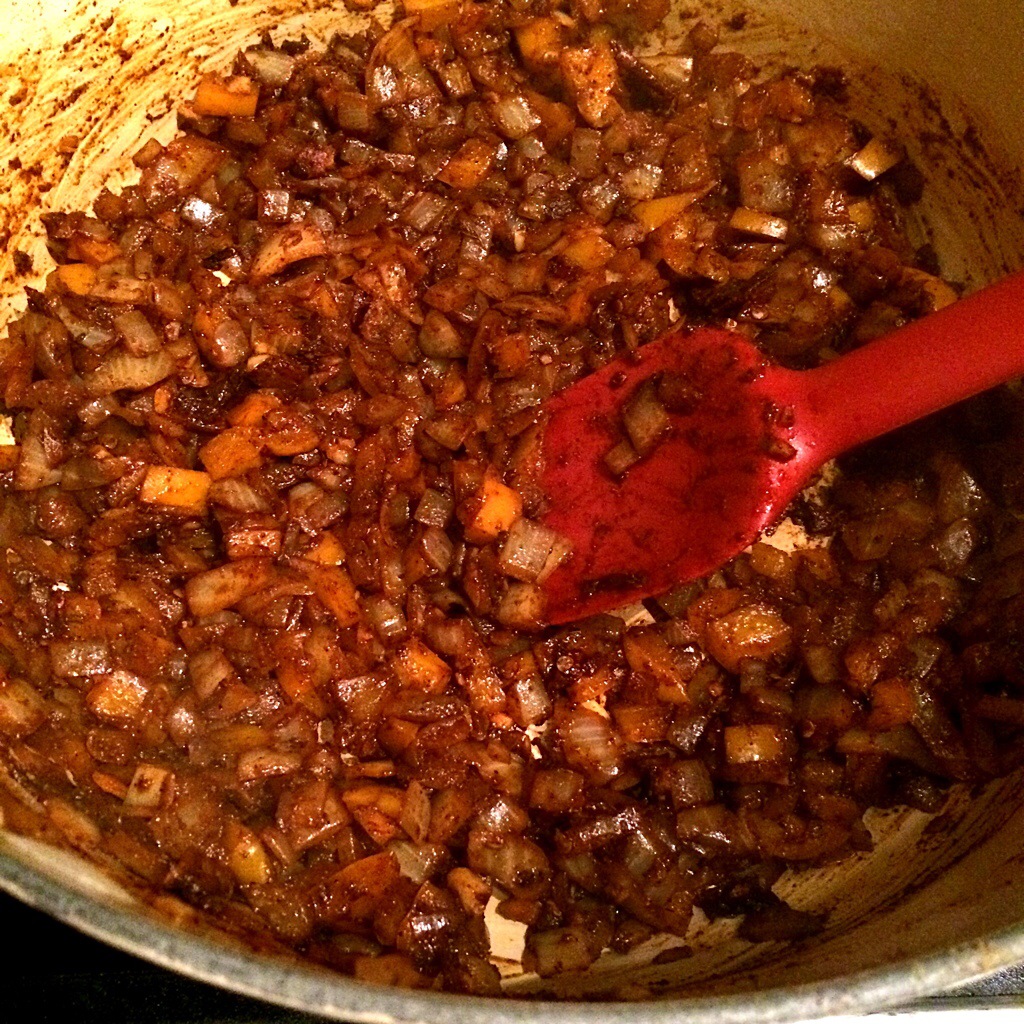
In the same pot, add onions, garlic, bell pepper, and a pinch of salt. Cook veggies until soft. Add chipotle peppers, chili powder, cumin, oregano, and brown sugar. Stir together and let cook for about 2 minutes. Step 3:

Dump cooked veggies into slow cooker. Add maple syrup, diced tomatoes, petite tomatoes, beef broth, pumpkin purée, black beans and stir to combine.

20140917-193214-70334442.jpg

Add short ribs into the liquid. Add cloves at the very top so you can find them to discard later. Cover and cook on low for 6-8 hours.

Step 4:

20140917-193300-70380368.jpg
20140917-193338-70418962.jpg
20140917-193425-70465177.jpg
20140917-193606-70566934.jpg

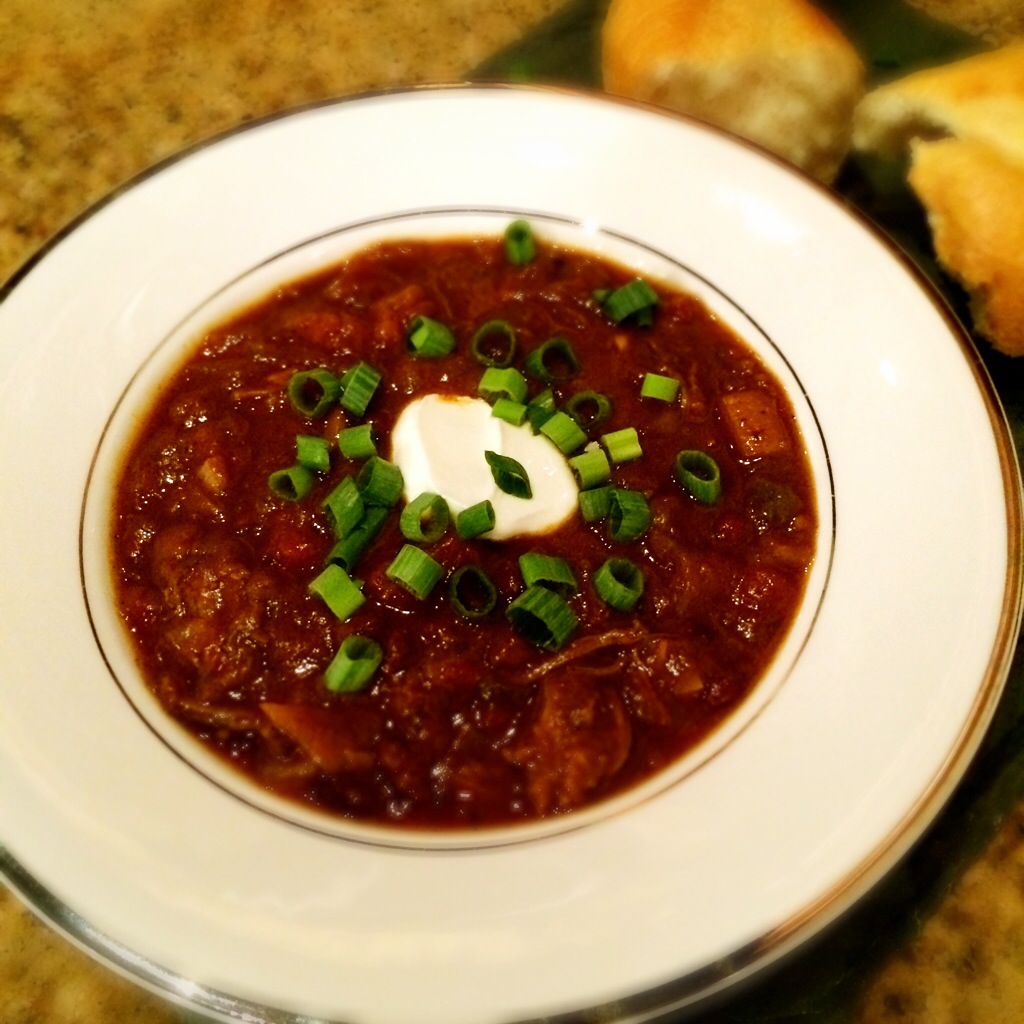
Uncover the cooked chili and discard cloves. Transfer short ribs onto a plate or cutting board. Remove the bones and fat and discard. Shred the short rib meat into small pieces with two forks or your hands. Skim the surface of the chili to remove any extra fat that floated to the top. Add the shredded meat back into the slow cooker and stir to combine. Stir in the cinnamon. Taste the chili and add 1/4-1/2 tsp of salt if needed. Serve in bowls and top with green onions and sour cream if desired.

CHEERS TO HAPPY EATING!!!

In Dinner, Recipes, Lunch, Meat, Soups Tags best chili recipe ever, what to cook for large group, best beef recipe ever, cooking for the fall, best pumpkin recipe ever, what to do with canned pumpkin, easy ideas using pumpkin, braised short ribs, short rib chili, halloween recipes, cooking with ahort ribs, pumpkin chili recipes, cooking in october, unique chili recipes, cooking in september, savory pumpkin recipes, cooking for halloween, halloween party recipes, unique chili, fall cooking, using pumpkin to cook, pumpkin recipes, fun cooking, cooking with pumpkin, short rib recipes, easy pumpkin recipes
Comment

Berry Vanilla French Toast

September 10, 2014 tatumletard@gmail.com
20140910-221442-80082498.jpg
20140910-183010-66610673.jpg
20140910-183105-66665448.jpg

French toast is one of the first meals I ever remember cooking. I've always heard that most kids learn to cook for the first time by making breakfast, and in my case, this proves to be true. French toast was always one of my favorite make-at-home breakfasts, and I remember when I got old enough, it was just the easiest thing in the world to jump in the kitchen early in the morning, mix up some eggs with milk, add a splash of vanilla, some sugar, some cinnamon, and dip whatever bread we had in the pantry into the mix and fry it up in butter. That was the quickest, easiest way to make French toast, and as a youngun, I always felt like such a great cook making this meal! Here's a fancier version of one of the simplest breakfasts in the world: Berry Vanilla French Toast. Fruity and fabulous.

Grocery list (4 people):

1/3 cup blueberries

1/3 cup blackberries

2 tbsp sugar

5 eggs

1/2 cup cream

1 tsp vanilla

1 vanilla bean scraped

1/4 tsp ground ginger

1 tbsp honey

1/4 tsp salt

1/2 cup maple syrup

1 loaf Challah bread

Step 1:

20140910-183147-66707754.jpg

Mash the blueberries and blackberries in a bowl with a fork or potato masher, add sugar and stir together. Set aside.

Step 2:

20140910-183231-66751233.jpg

In a shallow bowl or pan, lightly whisk together the eggs, cream, vanilla extract, vanilla bean, ginger, honey, and salt. Add half of the berry mixture and whisk until combined.

Step 3:

20140910-183448-66888649.jpg

Make the syrup. In a small saucepan, add the reserved mashed berries, maple syrup, and a pinch of salt. Bring to a boil and simmer over low heat.

Step 4:

20140910-183310-66790790.jpg
20140910-183521-66921282.jpg

Heat butter in a skillet over medium heat. Cut bread into 1/2 inch slices. Dip bread into the egg mixture on each side. Make sure each slice has plenty of egg mixture on it. Fry slices until golden brown on each side. Top with the warm berry syrup.

CHEERS TO HAPPY EATING!!!

In Recipes, Breakfast & Brunch, Sandwiches and Bread, Sweets Tags cooking with blackberries, cooking with blueberries, what to do with blackberries, using leftover bread, how to make the best french toast, the best thing i ever ate, using leftover eggs, the best french toast, old school french toast, how to make french toast, old fashioned breakfast, the best breakfast ever, french toast recipes, old fashioned french toast, what to do with blueberries, how to make breakfast, cooking with berries, favorite breakfast
Comment

Balsamic BBQ Meatballs with Rudolph's Pork Rinds

August 27, 2014 tatumletard@gmail.com
Balsamic BBQ Meatballs.jpg

These one of a kind meatballs are my final recipe that was featured on Local Memphis Live last week. A sweet and tangy balsamic BBQ sauce gives these meatballs a fun twist, but it's really the pork rinds that make this recipe stand out. Pork rinds in meatballs?!?!?! What in the world?! Well, traditionally breadcrumbs are featured in meatballs, and we've all had a BBQ flavored meatball so put the two together and you have quite a unique meatball! Pork rinds were a fun subject for me to discuss on the Local Memphis Live segment because it immediately brought back a childhood memory. When I think or pork rinds I think of being a kid on a road trip. When I was a kid, we would go on summer trips to the beach, and what I remember most were the gas station stops. We would make pit stops and stock up on snacks for the car. As strange as it may sound, pork rinds were always a family favorite. I've grown up eating pork rinds, so cooking with them made a lot of sense!

IMG_5051.jpg

Grocery list (makes about 20 meatballs):

Sauce:

1/3 cup ketchup

1/3 cup balsamic

2 tbsp brown sugar

2 tbsp Dijon

1 tbsp apple cider vinegar

1/2 tbsp Worcestershire

1/2 tsp garlic powder

1/4 tsp salt

Meatballs:

1/2 lb pork

1/2 lb ground beef

1/3 cup grated onion

1 garlic clove minced

1/4 cup parm

1 tbsp cream or milk

1 egg - beaten

2 tbsp basil - minced

1 tsp salt

1 cup Rudolph's Original Pork Rinds (or breadcrumbs) 

Directions:

Step 1:

IMG_5052.jpg

Start by making the sauce. In a small saucepan, whisk together the ketchup, balsamic, brown sugar, Dijon, apple cider vinegar, Worcestershire, garlic power, and salt. Set over low heat and whisk until smooth.

Step 2:

Heat oven to 350 degrees.

IMG_5053.jpg
IMG_5054.jpg
IMG_5055.jpg

Make the meatball mixture. In a mixing bowl, combine the pork, beef, onion, garlic, parm, cream, beaten egg, basil, and salt with a fork. Don't over mix. In a plastic bag, crush your pork rinds into very fine crumbs. You can also do this in a food processor. Add the crushed pork rinds and combine the mixture with your hands. Again, don't over mix. Just mix together until well combined.

Step 3:

IMG_5056.jpg
IMG_5057.jpg
IMG_5059.jpg

Make your balls. You can use your hands but I like to use a small ice cream scoop so they're all the same size. Place meatballs on a baking sheet and spoon a small amount of the Balsamic BBQ sauce over each ball. Bake for 35-40 minutes. Serve extra sauce alongside for dipping.

CHEERS TO HAPPY EATING!!!

In Recipes, Meat, Snacks, Snacks & Apps Tags southern cooking, southern recipes, andrea letard, cooking tv, blogger, bbq, meatballs, recipe blogger, cooking blog, balsmic bbq, memphis cooking, memphis food, tailgate recipes, memphis recipes, live cooking demo, lifestyle blog, rudolphs pork rinds, bbq meatballs, lifestyle blogger, recipe blog, football recipes, andreas cooktales, southern food, cooking blogger
Comment

Pork Rind BBQ Nachos

August 20, 2014 tatumletard@gmail.com
Pork Rind Nachos.jpg
20140820-174316-63796980.jpg

To continue my recipes from the Local Memphis Live TV segment on Tuesday, today I'm posting recipe #2: Pork Rind BBQ Nachos. This is a low carb version of the real thing. And I have to say, using pork rinds instead of tortillas may just give the original recipe a run for it's money. If you live in Memphis, you know that BBQ nachos are a staple around here. If you don't live in Memphis and you come to Memphis, the first thing you should eat is BBQ Nachos. I'm not joking. Do it.

This fun snack will always remind me of Redbirds and Grizzlies games. Yeah sure, we love watching the games, love the atmosphere, and love all the fun that comes along with the 'Birds and Grizz, but I have to admit, half the reason me and Tres go to the games are for the BBQ Nachos! We can't be in our seats for more than 5 minutes without getting an order of BBQ Nachos and a beer. It never fails and never will! Now we can make them at home -- low carb!

20140820-174155-63715031.jpg

Grocery List:

1 bag Rudolph's BBQ Pork Rinds

32 oz pulled pork (I like to use leftovers from sandwiches the night before or you can find it in the freezer section of your grocery store)

1 cup cheddar cheese - grated

1/2 cup (or more) BBQ sauce

1 jalapeño - chopped into rounds (optional)

Parsley - for garnish

Directions:

Step 1:

20140820-174535-63935716.jpg
20140820-174236-63756438.jpg

On a large platter, spread out the pork rinds directly from the bag.

Step 2:

Top the rinds with the pulled pork, then the cheese, and finally the BBQ sauce (you can add as much or little of any of these as you like).

Step 3:

If you like a little spice, add the chopped jalapeño. Garnish with parsley.

CHEERS TO HAPPY EATING!!!

In Snacks & Apps, Recipes, Healthy, Lunch, Meat, Snacks Tags southern food, recipes, southern recipe blogger, game recipes, gameday recipes, local memphis, rudolphs food, pork rinds, gameday cooking, party food, party recipes, south recipe, cooking in the south, southern food blog, local memphis live, food blog, party apps, apps, southern blog, southern recipe, southern recipes, food, southern cooking, southern recipe blog, cooking with pork rinds
1 Comment

Smoky Goat Cheese Stuffed Dates

August 13, 2014 tatumletard@gmail.com
Vegetarian Dates.jpg

Some "cooktales" are a little more special than others. Last weekend, I cooked for a very special occasion: my brother'a wedding. It was my first catering job of sorts, and the food got rave reviews which made me more than happy. This recipe happened to be the hit of the wedding food spread. It's one of the quickest, easiest recipes I've ever created, and people will think you spent hours making it taste so great!

20140813-062533-23133963.jpg

Grocery List:

20-30 dates - pit removed and sliced in half Smoked salt

8-10 oz goat cheese - room temperature

1/4 cup milk

40-60 whole pecans - roasted

Balsamic glaze - for drizzling

Directions:

Step 1

20140813-062708-23228313.jpg

Heat a grill pan to high heat and brush the pan with olive oil. Lightly salt each date half with the smoked salt (they look like little bugs... Don't be alarmed. Haha!)

 Step 2

20140813-063332-23612883.jpg

When grill pan is hot, grill the dates. Start cut side down and grill for one minute on each side or until dates have dark char marks. Set dates aside and let cool.

Step 3

20140813-063505-23705064.jpg

Mix the milk and goat cheese together until smooth. Fill each date with about 1 tsp of the goat cheese mixture.

Step 4

20140813-064351-24231834.jpg

Lightly sprinkle more smoked salt over the goat cheese. Top each date half with one roasted pecan and drizzle with balsamic glaze.

CHEERS TO HAPPY EATING!!!

20140813-064506-24306687.jpg
In Snacks & Apps, Recipes, Breakfast & Brunch, Snacks Tags snacks, memphis recipes, balsamic apps, date recipes, memphis cooks, recipes, goat cheese recipes, memphis cooking, memphis food, local memphis, easy apps, balsamic recipes, memphia food, apps, easy app recipes, dates, easy date recipes, goat cheese apps, stuffed dates, goat cheese dates
1 Comment

Bacon Wrapped Date Flight

July 31, 2014 tatumletard@gmail.com
20140731-191513-69313111.jpg

How many of you go out to dinner and can't ever make up your mind what to order off the menu? I tend to sit down and drive myself crazy with a decision on what to order every time I go out to dinner. I consider myself a "little of this and a bite of that" type of gal. I want to try a few bites of EVERYTHING. I mean, what if I order the wrong thing? As I've told my husband before, "my taste buds get bored... I want it all." It's not uncommon for me to go to a restaurant (sometimes even alone) and order several apps and a dinner entree, particularly when I'm traveling. After all, what if I never get to eat at that restaurant again, and I miss something unforgettable? There's no denying different foods, flavors, and variety is important to me when it comes to my meals. That's why I respect the ever-living heck out of the Spanish. A little thing called tapas exists because of these fine folks, and we are finally picking up on it in the US. That's why I love the concept of a "small plates" or a "bites" menu when I walk into a restaurant. I don't need 100 bites of the same thing... I need 100 bites of several things. I'd like to tell every restaurant out there: GIVE ME ALL YOU HAVE BUT NOT A LOT OF IT! Besides, a "tasting" menu is just so fun.

There's something festive about sitting with a group of friends trying little bites with wine sips in between and debating on which bite or plate was the best. Because bacon wrapped dates have become so popular, I decided it'd be fun to have a "flight" of them - Maple Espresso, Cinnamon Sugar, Lemon Rosemary, Chipotle, and Balsamic Honey. This is so much fun for small get togethers or parties, and you could even have everyone vote at the end. Y'all do this at your next party and let me know which date wins!

20140731-140750-50870506.jpg

Grocery List (serves 4 people 5 dates):

For all the dates:

5 small bowls

5 spoons

5 pieces of foil - cut approximately 12 inches and folded around the edges to make a wall around each edge

10 slices of bacon - cut in half

10 dates - pitted and cut in half

For the Maple Espresso dates:

1 tbsp espresso

2 tbsp brown sugar

1/4 cup maple syrup

For the Cinnamon Sugar dates:

2 tbsp sugar

1 tsp cinnamon

For the Lemon Rosemary dates:

2 lemons - zested

1 tsp rosemary

For the Chipotle dates:

1 chipotle peppers in adobo sauce

2 tbsp adobo sauce

1 tsp chili powder

1/2 tsp cumin

1 pinch cayenne

For the Balsamic Honey dates:

2 tbsp balsamic vinegar

2 tbsp honey

1/4 tsp vanilla extract

Directions:

Step 1:

Heat oven to 400 degrees.

20140731-190036-68436231.jpg

Make the mix for each date flavor. In the first bowl, mix together the espresso, brown sugar, and maple. In the second bowl, mix together the cinnamon and sugar. In the third bowl, mix together the lemon and rosemary. In the forth bowl mix together the chipotle, chili powder, cumin, and cayenne. In the fifth bowl mix together the balsamic, honey, and vanilla.

Step 2:

20140731-211215-76335723.jpg
20140731-190318-68598388.jpg

Wrap the dates. You should have 20 date halves and 20 bacon halves. Wrap each date, and if necessary, you can secure with a toothpick. Step 3: Working with one mix at a time, dip 5 bacon wrapped dates into each mix. Completely cover each date, using as much of the mix as possible. Wash hands in between dipping dates into each flavor so they don't mix with the others. Place each flavored date on a piece of foil keeping like flavors together.

Step 4:

20140731-190503-68703166.jpg

Place foil sheets on two baking sheets - two on one baking sheet, three on the other. It's important that the foil pieces have a wall around each edge so flavors don't mix (it also makes for easy cleanup). Bake until bacon is crisp, about 15 minutes. I like the plate these individually so everyone has a "flight." Or you can just use five small plates or one large plate with the dates piled. Labels would be fun or you could play a guessing game and have guests guess the flavors in each!

CHEERS TO HAPPY EATING!!!!

In Recipes, Breakfast & Brunch, Snacks Tags party recipes, fun food, flight recipes, apps, fast recipes, party apps, tapas, appetizers, party ideas, dates, dinner party, recipes, food, bacon wrapped, easy party ideas, appetizer recipes, tasting recipes, easy recipes, tapas recipes, fast party ideas, party food, unique party, date recipes, bacon, flights, quick and easy party, quick and easy recipes, summer food, summer recipes, unique recipes, easy apps, bacon wrapped dates, unique tasting, fast apps, tasting party, unique party foos, bacon recipes
Comment

French Inspired Sangria

July 28, 2014 tatumletard@gmail.com
French Sangria.jpg
20140728-121300-43980908.jpg

Everything about the French life and culture inspires my cooking daily. Because of the French, we now understand and love food in America the way the French have for years. Thanks to the likes of food-obsessed Americans such as Julia Child, M.F.K. Fischer, and James Beard who lived in France and brought French food culture to the US, we now have a country full of "foodies." Every self-proclaimed foodie must spend time in France. It's completely necessary to even get the slightest glimpse of what food is really all about.

This recipe comes inspired by mine and Tres' trip to The champagne region of France last year. There's nothing quite like "champagne country" because guess what?! There's only ONE!!! If you've ever wondered why champagne is so rare and so expensive, it's because champagne is only made in one place: France. You see, champagne can only be made here because the terrain, soil, and climate are absolutely perfect to get the distinct flavor and consistency that is champagne. It's pretty spectacular when you think about it.

As special and fancy as champagne may be, throwing $70+ dollars into a Saturday afternoon cocktail is not always my style. Actually, it's never my style. I would prefer that amount of money to be drank solo... No need to mix it up and wash it down with simple syrup. So, in this case, I cheated a little bit. You don't need champagne for this drink. A sparkling wine, Cava, or Prosecco rose will do just the trick! Rose Lillet, a French aperitif, is added for a zip and sweetness, and something about the fresh honey and berries give this drink a very "French countryside" feel. I want to be in Provence looking at Lavender fields when I drink this. 

20140728-121129-43889106.jpg

Grocery List:

  • 1/2 cup honey

  • 1 cup water

  • 1 lemon

  • 3/4 cup of strawberries - sliced

  • 3/4 cup of Rainier cherries - pitted and halved

  • 3/4 cup red raspberries

  • 1 cup rose Lillet - chilled

  • 1 bottle sparkling rose - chilled


Directions: 

Step 1: 

Make the berry-honey syrup. In a saucepan, bring the honey, water, and 1/4 cup each of the strawberries, cherries, and raspberries to a boil. Slightly mash the berries in the syrup and set aside to cool. 

Step 2:

20140728-121508-44108074.jpg

Add the remainder of the berries to a pitcher. Slice a lemon in half. Juice one half into the pitcher and slice the other half into small pieces and add with the berries.

Step 3:

20140728-121617-44177518.jpg

 Strain the berry-honey syrup into the pitcher and discard the mashed berries. Add the Lillet and the bottle of sparkling rose into the pitcher. Stir and serve!

CHEERS TO HAPPY DRINKING!!

In Cocktails & Mocktails, Breakfast & Brunch, Recipes Tags cocktail wars, pink drinks, unique cocktails, party drinks, easy sangria, summer champagne, easy drinks, champagne cocktails, summer drinks, berry drinks, sparkling drinks, pretty cocktails, lillet drinks, mixologist cocktails, pretty drinks, drink recipes, easy cocktails, champgane drinks, cocktail recipes, cocktail ideas, fruit drinks, pink cocktails, wine cocktails, wine drinks, summer cocktails, cocktails, mixology drinks, drinks, quick cocktails, girls party, fancy drinks, sangria recipes, rose, rose sangria, lillet cocktails, fancy cocktails, sparkling cocktails, simple sangria, girly drinks, rose cocktails, fruity drink recipes, party cocktails, girly cocktails, french sangria, berry sangria, sangria, french drinksc french cocktails
Comment

Fig Toast

July 20, 2014 tatumletard@gmail.com
FullSizeRender.jpg
20140720-133928-49168889.jpg

One of my favorite things to do on a Saturday or Sunday morning is tip-toe out of bed without waking Tres and have breakfast made for him before he gets up. I make my coffee, pull out whatever ingredients I picked up from the market during the week, and create something with whatever I have on hand. I never turn on the TV or listen to the radio. I just simply enjoy the silence I have in the kitchen. It's so relaxing. I did this very thing yesterday and loved the recipe I made so I wanted to share it with you. We've all heard of Avocado Toast but for a much "sweeter" version, try Fig Toast!

Grocery List (for 2):

2 pieces thick cut bread

2 tbsp butter

4 ripe figs - chopped

1 tbsp honey

1/2 tsp cinnamon

1/8 tsp salt

1 inch honeycomb (or more honey)

Balsamic vinegar

Directions:

Step 1:

20140720-134000-49200731.jpg

Toast and butter the bread.

Step 2:

20140720-134032-49232101.jpg
20140720-134108-49268705.jpg

With a fork, smash the figs together in a bowl with the honey, cinnamon, and salt. Spread the mixture thickly and evenly over the bread.

Step 3:

20140720-134155-49315466.jpg

Slice and crumble the honeycomb over top of the mixture. If you don't have honeycomb, no problem! Just drizzle a little more honey over the top.

Step 4:

20140720-134249-49369542.jpg

Drizzle the toast with balsamic.

CHEERS TO HAPPY EATING!!!

In Recipes, Sandwiches and Bread, Healthy, Breakfast & Brunch, Sweets Tags brunch recipes, avocado toast, fast breakfast, brunch, summer recipes, fig recipes, quick breakfast, fig toast, bread recipes, easy breakfast, fruit recipes, easy breakfast recipes, figs, breakfast, toast, breakfast recipes
Comment

Coffee Rubbed Filet Mignon

July 16, 2014 tatumletard@gmail.com
IMGL0471.jpg
20140716-175348-64428732.jpg
20140716-161539-58539540.jpg
20140716-173222-63142870.jpg

I decided I loved to cook a couple of years ago when I was in between jobs and had not much else to do except be a housewife, and because that requires cooking, I did a lot of cooking TV watching. I was in graduate school at the time, so I kept busy with that, but I got so infatuated with watching cooking shows that when I wasn't studying or writing a paper, I was watching "my friends," on Food Network and Cooking Channel. These random people on TV led me to this life and love of cooking. In between cooking shows, I would google recipes, read cookbooks and cooking magazines, and soon enough, I started writing my own recipes. It's the watching, reading, and studying about food that inspires me, and from several years of having food overload on my brain I've gotten kind of decent at this. It probably doesn't hurt that not only do I read cookbooks as if they're novels, but I actually enjoy it. This recipe reminds me of the beginning of my cooking obsession because I was inspired to write this recipe when I saw something similar on a few cooking shows. Sometimes it just takes inspiration from a few recipe to create your own. That's what I did with this one.

Grocery List (4 people):

4 (1 1/2 inch thick) filet mignons

2 tbsp butter - melted

1/2 cup brown sugar

1/4 cup coffee grind

1 tbsp smoked salt (or Kosher)

2 tsp granulated garlic

2 tsp paprika

2 tsp red chili pepper

1 tsp cinnamon

1/2 tsp black pepper

Directions: Step 1:

Take steaks out of the fridge and let come to room temperature for about 15-20 minutes.

20140716-173319-63199266.jpg

Step 2:

Make the dry rub by mixing together the brown sugar, coffee grind, salt, garlic, paprika, chili pepper, cinnamon, and black pepper.

20140716-173358-63238478.jpg

Step 3:

Brush the steaks lightly with the melted butter and generously rub them with the coffee mixture. I like them to have a thick layer of the rub on all sides.

20140716-173443-63283294.jpg

Step 4:

Grill the steaks on high heat for about 6 minutes per side (or 135 degrees with a meat thermometer) for medium-rare steaks.

20140716-173524-63324271.jpg

When finished grilling, set steaks aside with foil tented over the top of them for 10 minutes before cutting into them. Serve with duck fat fries or any side you wish! 

20140716-173601-63361764.jpg

CHEERS TO HAPPY EATING!!!

In Recipes, Dinner, Meat Tags lifestyle blog, easy recipes, blogging, steak, healthy recipes, meat eater, heathly eating, recipe blogger, recipes, easy dinner, cooking blog, cooking blogger, coffee recipes, lifestyle blogger, recipe blog, meat recipes, blogger, steak recipes, fast dinner, fast recipes
1 Comment

BLT Chicken

July 14, 2014 tatumletard@gmail.com
.

.

I can't lay my eyes on a tomato without thinking of my great-grandmother, aka Grams. As a kid, I remember visiting her in Coffeeville, Mississippi, a little town off of I-55 that isn't bigger than a minute (that's about how long it takes to drive through it). Grams always ate tomato sandwiches. That's one of the first things I think of when reminisce about visiting her... Tomato sandwiches. Sometimes I think she must have eaten them for breakfast, lunch, and dinner. Plain white bread, fresh tomatoes from the garden, and mayo... How can you not like her style?! I mean, that's perfection! Not to mention, she was a tiny little lady, so they must not have an effect on the waistline either! Back then, I wasn't real fond of tomatoes, but today, I call that an absolutely delicious, flawless meal. I loved visiting my Grams in that little town, and I can see her in my mind now, sitting at the little kitchen table in her house eating tomato sandwiches. Tomatoes are my life in the summer... And they should be all of yours too! It' the most extravagant fruit of all time, and they're only perfect this very season! Hence, y'all are gonna see me posting a lot of recipes with tomatoes in the next several weeks... Particularly BLTs. In the summer months, I eat BLTs like bacon and tomatoes will never exist again. It's totally necessary. Here's a fun version of a BLT... Plenty more where this one came from.

20140714-161621-58581125.jpg

Grocery List (for two):

2 skinless boneless chicken breasts

2 tbsp mayo 1

lemon - zested and juiced

2 tsp chives - chopped

2 small tomato - cut into 4 thick slices and dried with paper towels

4 slices of thick cut bacon

8 oz shredded lettuce

1 tbsp creamy Dijon mustard (you can buy this in the bottle, but if you can't find it, use regular Dijon and add 1 tsp of mayo)

2 tbsp olive oil

Avocado (optional)

Kosher Salt

Pepper

Toothpicks

Directions

Step 1:

Heat oven to 400 degrees. Lightly salt and pepper both side of the chicken breasts. Set aside.

Step 2:

Prepare the mayo spread. Mix together the mayo with chives, lemon zest, 2 tsp of lemon juice, and 1/4 tsp of salt and 1/4 tsp of pepper.

20140714-161733-58653192.jpg

Step 3:

Spread 1 tbsp of mayo on top of each chicken breast.

20140714-161823-58703892.jpg

Top each with two slices of the dried off tomato slices. Wrap bacon around the chicken and secure with a toothpick on top of each tomato (the bacon should help hold the tomato slices into place). Place each prepared breast on a baking sheet lined with foil and bake for 35 to 40 minutes or until bacon is crispy. 

20140714-162006-58806814.jpg

Step 4:

Prepare the salad. Mix together the mustard with a dash of salt and pepper. Whisk in olive oil slowly. Put shredded lettuce in a bowl and toss with the dressing (do this right before serving so the lettuce doesn't get soggy).

20140714-162106-58866425.jpg

Split the salad in half and make a "bed" on each plate. Top the salad with the prepared chicken. Top the chicken with avocado if desired.

CHEERS TO HAPPY EATING!!!

In Recipes, Dinner, Healthy, Meat Tags easy recipes, unique recipes, easy dinner, chicken recipes, dinner tonight, family dinners, easy chicken dinners, easy meals, easy cooking, blts, weeknight cooking, easy chicken recipes, family meals, easy chicken meals, dinner, blt
Comment

Fried Green Tomatoes with Herb Goat Cheese

July 8, 2014 tatumletard@gmail.com
Fried Green Tomatoes with Herb Goat Cheese.jpg
.

.

A few several Saturdays ago, me and a couple of my "steel magnolias" made a batch of "fried green tomatoes." It was a long Saturday of being in the kitchen, drinking cocktails, laughing, telling stories, and just enjoying each other's company - a rare thing for us these days. I'll never forget going into college thinking I'd never find friends as strong and fantastic as the ones from high school. My mom assured me that in every stage of my life I would make new friends and they would be "just as fabulous" as the ones before. I have to say though, my college group of gals is and will always be "my most fabulous friends." They are my best friends, as time goes on, I realize more than ever that it's going to take more than being in different cities, busy work and family lives, and finding less and less time to get together to break the close bond we created in college and have sustained as adults. It's crazy to think I've known these girls for over 10 years now, and near or far, we do the best we can to get together at least a few times a year (the constant 24/7 group text we've had going for several years now doesn't hurt either). These southern gals are my magnolias, and this fried green tomato recipe is dedicated to y'all... I hope we make them together for another 50 years!

.

.

.

.

Grocery list:

Peanut oil - for frying

5 oz goat cheese - room temperature

1/2 lemon - juiced

2 tbsp basil - chopped

1 tbsp parsley - chopped

1 tbsp chives - chopped

Kosher Salt

Pepper

1 cup flour

1 cup buttermilk

1 1/2 cup yellow cornmeal

1 tbsp garlic powder

1/2 tsp paprika

1/4 tsp cayenne

4-5 green tomatoes


Step 1

Heat peanut oil to 350 degrees in a fryer or on your stovetop.

Make the herb goat cheese. Mix together goat cheese, lemon juice, herbs, and a dash of salt and pepper. Set aside.

20140708-143133-52293986.jpg

Step 2

Whisk 1 cup flour and 1 cup buttermilk together in a bowl. In another more shallow bowl, mix together the cornmeal, garlic powder, cayenne, and paprika.

20140708-143233-52353943.jpg

Step 3

Slice tomatoes 1/4 inches thick. Dry the tomatoes with paper towels. Salt and pepper them on both sides.

.

.

Dip tomatoes in buttermilk mixture and then coat them in the cornmeal mixture.

.

.

Step 4 Fry coated tomatoes until golden brown. Plate the fried tomatoes and dollop with goat cheese. Serve warm or at room temperature.

.

.

CHEERS TO HAPPY EATING!!! AND BEST GIRLFRIENDS!!!

.

.

In Recipes, Breakfast & Brunch, Sides, Snacks, Snacks & Apps, Vegetarian Tags lifestyle blog, southern recipes, easy recipes, home cooking, food and friends, quick cooking, cooking with friends, chefs blog, tomato recipes, girlfriends, fried food, cooking blog, fried green tomatoes, cooking at home, best friends, best southern recipes, best fried green tomatoes, recipe blog, quick recipes, farmers market recipes, weekend recipes, weeknight recipes, fried southern food, cooking, chef blog, fast recipes
Comment

Fig and Prosciutto Salad with Mint Dressing

July 1, 2014 tatumletard@gmail.com
20140701-162552-59152552.jpg
20140701-155700-57420659.jpg

20140701-155700-57420659.jpg

Simple weeknight dinners are sometimes the best dinners. Easy salads on Monday nights make me think of two things: 1) little stress in the kitchen and 2) clean eating for an after weekend detox. After a long Monday at work, particularly a stressful one, nothing beats coming home, putting our feet up, watching TV, and eating a good meal. Sure, it's always great to do a more formal meal at the dining table or even a fun little wine dinner out on the patio every once in awhile during the week, but most Mondays call for sitting in front of the TV and vegging. Like most of the world, we have become Netflix binge watchers and it's what I love to do on Monday nights. A few hours of mindless TV is just simply something great to look forward to after being at work all day. And nothing makes it more special than doing it with the person I love the most, all while having a delightful meal sitting in between us and the TV. I came up with this simple salad recipe last night and couldn't wait another day to share it!

Grocery List (for two):

5 oz spinach and arugula salad mix 6 large figs (dates would also work if you can't find figs) 3 red radishes - thinly sliced 4 oz goat cheese 4 oz thinly sliced prosciutto 2 tbsp balsamic vinegar 1/2 lemon - juiced and zested 1/4 cup mint - minced 1 tsp honey 1/3 cup olive oil Salt Pepper

Directions:

Step 1

20140701-155747-57467011.jpg

20140701-155747-57467011.jpg

20140701-155828-57508426.jpg

20140701-155828-57508426.jpg

Cut each fig in half and toss them all with a little olive oil, salt, and pepper. Set a grill pan to medium high heat. Grill the figs for 3 minutes cut side down. Flip them and grill another two minutes. Set aside to cool down then slice each half into two pieces. Step 2

Toss radishes with a little olive oil, salt, and pepper. Grill radishes slightly for about 1 minute per side. Set aside to cool.

20140701-155914-57554090.jpg

20140701-155914-57554090.jpg

Step 3

Prep the salad dressing. Mix together balsamic, lemon juice and zest, mint, honey, and a dash of salt and pepper. Slowly stream in olive oil while whisking. Taste the dressing and add salt and pepper to desired taste.

20140701-160027-57627595.jpg

20140701-160027-57627595.jpg

Step 4

Prep the salad. Toss greens into a bowl and add pieces of the sliced prosciutto on top. Crumble the goat cheese over the greens and prosciutto and add cooled radishes and figs. Add the dressing and toss together.

20140701-160125-57685554.jpg

20140701-160125-57685554.jpg

CHEERS TO HAPPY EATING!!!

In Lunch, Dinner, Recipes, Salads Tags easy cooking, lifestyle blogger, cookingblog, lifestyle blog, easy salads, good salads, salads, summer salads, easy recipes, figs, healthy food, blogger, cooking blogger, food network, summer eating, healthy recipes, recipe blogger, summer recipes
Comment

Truffle Duck Fat Fries

June 30, 2014 tatumletard@gmail.com
Truffle Duck Fat Fries.jpg
20140630-120730-43650547.jpg

There was a time in my life when the thought of eating duck was not at the top of my list. But today, I'll take the fat and all of it. This recipe reminds me of parties. I love to throw them and I do often. I've made these duck fat fries a number of times for get togethers, tweeking the recipe along the way. I've learned it's also a great side for burgers or a nice juicy steak. We had it the other night with coffee rubbed filets, and I plan to share that recipe with you all very soon! I think I finally nailed the perfect duck fat fry, and this is the recipe I want to share with you!

Grocery List (4 people):

20140630-120841-43721791.jpg

4 russet potatoes

4 tbsp duck fat (find it jarred at specialty food stores)

Truffle salt

Pepper

1 tbsp truffle oil

1 tsp garlic - minced

1 tsp rosemary - minced

1 tbsp truffle honey or regular honey

1/2 cup mayo

Fresh parmesan

Directions:

Step 1

Roughly peel the potatoes. You will want to leave some skin on.

20140630-120924-43764019.jpg

Cut potatoes in thick logs. You should get about 16 from each potato.

Soak logs in water for about 1 hour. This will get extra starch out and make them crispy.

20140630-121001-43801333.jpg

Drain potatoes and pat dry with paper towels.

20140630-121058-43858254.jpg

Step 2

Heat 2 tbsp of duck fat in a sautée pan over medium high heat (keep the duck fat close by, halfway through you may have to add another tablespoon or two).

20140630-121157-43917479.jpg

In batches, sautée potato logs for about 1-2 minute on each side in the duck fat. Place sautéed logs onto a baking sheet lined with foil. Sprinkle lightly with truffle salt and pepper.

Roast potatoes at 400 degrees for 20-25 minutes. The last 5 minutes, change the stove setting to broil. This will get them nice and brown and extra crispy.

20140630-121233-43953458.jpg

Step 3

While the potatoes are roasting, make the truffle mayo. Heat truffle oil over low heat. Add minced garlic and minced rosemary. Heat for 2 minutes and set aside to cool.

20140630-121327-44007386.jpg

When cooled, add olive oil mixture along with honey and 1/4 tsp of truffle salt (to taste) to the mayo. Mix together and taste. Add more salt if needed.

20140630-121417-44057698.jpg

Step 4

When potatoes come out of the oven, immediately sprinkle them with truffle salt and freshly grated Parmesan cheese. Serve with mayo along side.

In Snacks & Apps, Recipes, Sides, Snacks, Vegetarian Tags party recipes, fries, cooking blog, blogs, party planning, chef blog, home cooking, food blog, duck fat fries, baked french fries, lifestyle blogger, mayo recipes, chef blogger, cooking, easy recipes, french fries, truffle mayo, recipes, cooking at home, recipe blogger, food network, duck fat, blogger
Comment

Summer Squash and Zucchini Tomato Bake

June 24, 2014 tatumletard@gmail.com
squashbake.jpg

Tomatoes are to July and August as pumpkin is to October. It's the official start of summer, and for me that means being on the lookout for farmers markets anywhere, everywhere, and anytime. But sometimes, it doesn't take a farmers market to find the freshest produce around. I learned that as a kid, and I'm rediscovering it now. Growing up in a small town in Mississippi, I can remember regularly seeing people in blue overalls sitting on the side of the road in chairs with an old truck backed up to the street, tailgate down, and fresh produce spilling right off the back of the truck. That description may sound like I saw it in a painting in the Cracker Barrel and just decided to roll with it as a "childhood memory," but it is in fact the truth. Even today when I go back to my hometown, I see people in those same spots selling tomatoes, watermelons, and all the beauties of a farmer's summer garden. Because I now live in the city, it's rare to see random farm stands and trucks full of produce on the side of the road, but luckily, I travel to small towns for work and it's a lot of fun to keep an eye out for these little pop-up produce markets. This recipe comes inspired by a random market I found in one of the small towns I regularly visit. Similar to a ratatouille, this dish full of fresh, slowly baked veggies with a little surprise on the inside: cheese! And as for the newest random produce stand I found on the street, I'll just say as soon as I cut into the tomatoes, there was no question that they had just been picked that day. My kind of summer produce!

Grocery List (2 people):

IMG_4028.jpg
  • 4-5 large, even sized summer squash and zucchini

  • Kosher salt

  • 4 oz mascarpone cheese - room temperature

  • 4 oz goat cheese - room temperature

  • 3 tbsp. basil - minced

  • 1 tbsp. parsley - minced

  • 1 tsp garlic - minced

  • Pepper

  • 12 oz marinara

  • 1 tsp red pepper flake (optional)

  • 1 large tomato - sliced thick

  • Fresh parmesan

  • Olive oil

Directions:

1. Heat oven to 350 degrees and heat an oiled grill pan to high heat on the stove.

Cut the ends off of each squash and zucchini. One at a time, sit a squash upright with the cut side down so you have a flat, sturdy surface. Cutting downward, slice squash into long, thin pieces. Repeat with the zucchini. Avoid using the end pieces -- you only want the middle so each slice is even, thin, and easy to roll.

IMG_4036.jpg

Place squash and zucchini pieces on a rack and sprinkle with salt on both sides. Let stand for 10 minutes so the moisture comes out of the veggies.

IMG_4031.jpg

Lightly dry each squash and zucchini piece off with paper towels, trying not to remove all the salt from the veggies.

Grill each squash and zucchini piece 2-3 minutes on each side and set aside to cool.

IMG_4033.jpg

2. While the veggies are cooling, prepare the filling by mixing together the mascarpone, goat cheese, basil, parsley, garlic, and a dash of salt and pepper.

IMG_4034.jpg

Take one piece of squash and zucchini at a time, fill with about 1 tsp of cheese mixture, and roll up.

IMG_4035.jpg

3. Lay each rollup down in a small baking dish (if you double up the recipe, use a large baking dish - 9 x 13 in). Cover the pieces with the marinara and sprinkle the top with red pepper flakes.

IMG_4037.jpg

Top sauce with sliced tomatoes and grate fresh parmesan over the top.

IMG_4038.jpg

4. Bake for 20-25 minutes. Top with more basil and serve immediately.

 CHEERS TO HAPPY EATING!!!

In Dinner, Recipes, Healthy, Vegetarian, Lunch Tags veggie recipes, home and garden, veggies, recipes, food porn, home and garden blog, chef, kitchen, home blog, chopped, home, kitchen fun, cook, home cooking, easy cooking, meatless monday, cooking at home, healthy food, food blog, best recipes, food network, cooking blog, farmers market recipes, lifestyle blog, healthy eating, easy recipes, recipe blog, home chef, eating veggies, cooking
Comment

Pork 'N Peaches (or Pears)

May 22, 2014 tatumletard@gmail.com
IMG_3300.jpg

I wonder if every chef remembers the very first recipe they ever created all on their own. I do, and that’s the recipe and cooktale I’m sharing with you today. Pork ‘n Peaches. A classic meat and an essential summer fruit, and not to mention, butter, brown sugar, and roasted pecans. It sounds like a little southern dash of goodness doesn’t it? Well, let me tell ya’ll… IT IS! After about a year of doing nothing but watching Food Network, reading cook books cover to cover, studying recipes as if I had a test on them the next day and following them word by word with every measuring cup and measuring spoon I had in my cabinets, I decided to give up my fear of “a little of this and a dash of that” and boycott following recipes word for word. I mean, I could cook really well when I followed a recipe. It seemed everyone always loved what I cooked, and I had decent enough knowledge of food to give my family and friends tips regularly, so why couldn’t I just start making up my own recipes?

A Saturday morning at the farmer’s market and a sack full of peaches later, I walked in the kitchen and just downright went for it. I was scared. But I wanted to do it. I loved to cook, and I loved the challenge of a difficult recipe, so I thought it was time to start getting creative in the kitchen. In July 2012, my very own version of Pork ‘n Peaches was created, and that same day, my kitchen confidence went sky high. That was the day I went from “cook” to “chef.” I think this can happen for anyone who loves to cook. Don’t be afraid to get creative by taking ingredients you already have and just go for it! Does it always turn out perfectly? Heck no. But you learn and you move on to the next one. In the meantime, I’m happy for you all to follow my recipes, and hopefully I can teach you something along the way!

.

.

Grocery List (4 people):

Pork:

  • 2 lbs pork loin with fat trimmed

  • 2 tbsp olive oil

  • 1 orange (zest and juice)

  • 2 lemons (zest of one, juice of both)

  • 2 limes (zest of one, juice of both)

  • 1 tbsp fresh grated ginger

  • ¼ cup of brown sugar

  • 1 tbsp fresh thyme – chopped

  • 3 garlic cloves – minced

  • 2 tsp Kosher salt

  • 1 tsp pepper

Peaches or Pears (whatever is in season):

  • 4 peaches or pears (or one for each person) – halved, core or seeds scooped out

  • 2-3 tbsp of melted butter (or more if more fruit is used)

  • 1 tsp brown sugar for each peach/pear half

Dressing:

  • 1 lemon – juiced

  • 1/3 cup honey

  • 1 tbsp red wine vinegar

  • ¼ cup of mint – minced (plus some whole leaves for garnish)

  • Goat cheese – for topping

  • Pecans – for topping (recipe below)

Pecans:

  • ¼ cup whole pecans

  • 1 tsp olive oil

  • 1 tsp brown sugar

  • 1/4 tsp ground cinnamon

  • 1/8 tsp ground ginger

  • Pinch of cayenne

  • Pinch of salt

Directions:

Step 1:

Pork:

Start by making the marinade. Combine all the ingredients in a plastic Ziploc bag. Put pork in the bag and make sure it’s covered in the marinade. Let the marinated porksit in the fridge for at least an hour or more.

.

.

Grill on medium heat, turning every 5 minutes (and basting with remaining marinade as you turn) for 30 minutes or until the thickest part of the loin is heated to 155-160 degrees. It can be grilled indoors on a grill pan or on an outdoor grill. I prefer an outdoor grill’s flavor for this dish.

.

.

 Once the meat is the correct temperature, take off the grill and set aside. Tent the meat with foil and let rest for about 10 minutes.

To serve, slice meat in ½ inch pieces at an angle and top with chives for garnish. Serve alongside the peaches.

Step 2:

Peaches (these can be prepared when the pork is marinating):

.

.

Brush peach (or pear) halves with melted butter, liberally and sprinkle with the brown sugar. Set aside until ready to grill with the pork.

Grill for 3 minutes, cut side down. Flip, and grill for 2 more minutes on the other side.

.

.

For the dressing: combine the honey, lemon juice, vinegar, and chopped mint in a small sauce pan and whisk. Bring to a boil and let simmer for 5-10 minutes. Take off the heat to thicken.

.

.

Top grilled peaches (or pears) with dressing, goat cheese crumbles, and pecans.

Step 3:

Pecans (these can also be prepared when the pork is marinating):

.

.

Heat oven to 350. Toss pecans with olive oil, sugar, and spices. Roast for 12-15 minutes.

CHEERS TO HAPPY EATING!!!

In Dinner, Recipes, Healthy, Meat Tags best recipes, chef, chopped, cook, cooking, cooking at home, cooking blog, cooking in costa rica, easy cooking, easy recipes, food blog, food network, food porn, home, home and garden, home and garden blog, home blog, home chef, home cooking, kitchen, kitchen fun, lifestyle blog, mothers day recipes, peach recipes, pear recipes, pecan recipes, pork recipes, quick and easy recipes, quick recipes, recipe blog, recipes, simple recipes
Comment

Balsamic Salmon with Tomato Avocado Salad

May 20, 2014 tatumletard@gmail.com
image.jpg

I don't always come home exhausted and not willing to cook. Typically, cooking is what makes me happy and relaxes me after a long day. But there's a difference in having a long day and being down right exhausted. For the last couple of years, grad school has been my "after work activity" one or two days a week. Funny enough, I discovered my love for cooking about the same time I started grad school, and unfortunately, there wasn't always time to come home and cook a big elaborate meal when getting home at 9 pm on some nights. I was grateful to have a husband who would cook dinner or order takeout for us while I was in class and have it plated up and ready by the time I got home, but some nights, I just wanted to cook. It just helped me wind down. It did then, and it does now. On these nights I had to come up with something quick and easy to cook. I'm happy to say I have graduated with an MA in Journalism (yay), but that's not to say there still won't be nights I'll need a go-to, no-fuss meal. This is one of those meals... a meal that most people in the world will appreciate. 8 ingredients, 10 minutes... done!!! Thank you grad school for challenging me in this way!

Grocery List:

  • 1/2 cup good quality balsamic vinegar

  • Kosher salt

  • Good quality olive oil - 1 tbsp for each filet, plus some for the pan

  • 4 fresh salmon filets - skin off

  • 4 tomatoes - firm to the touch

  • 2 avocados

Directions:

1. Heat oven to 450 degrees. In a small saucepan, bring 1/4 cup of the balsamic and a pinch of salt to a boil and let simmer. Heat a saute pan with a splash of olive oil to the highest heat (like you're going to boil something) until olive oil is smoking. Sprinkle olive oil, salt, and pepper on each side of the salmon - about 1 tbsp of olive oil, 1/2 tsp of salt, and 1/4 tsp of pepper. 

2. When oil is smoking on the pan, place salmon on the pan face down and don't touch or move for 2 full minutes (not touching it creates an amazing crust... the kind you see on your salmon in restaurants). Flip salmon and let cook for 1 minute on the other side then put the salmon (pan and all) in the 400 degree oven for 3-4 minutes.

3. While salmon is cooking, cube the tomatoes and avocado, throw into a large bowl, and add the rest of the balsamic, 1 tsp of salt (or to taste), pepper, and stir together.

4. When the salmon is done, take out and set aside. To plate, put a serving of the tomato and avocado salad on a plate and top with the salmon. Spoon balsamic glaze over the fish and the salad.

CHEERS TO HAPPY EATING!!!

In Recipes, Dinner, Healthy, Seafood Tags recipe blog, home cooking, farmers market recipes, food network, home and garden blog, cooking blog, salmon recipes, healthy eating, home blog, healthy food, cooking at home, easy cooking, easy recipes, home, avocado recipes, recipes, lifestyle blog, kitchen, food blog, home chef, fish recipes, cook, home and garden, tomato recipes, cooking, chef, kitchen fun, best recipes, healthy recipes
1 Comment

Mimosa with Fresh OJ and Citrus Sugar Rim

May 18, 2014 tatumletard@gmail.com
IMG_3236.jpg

Mimosa... the simple drink that can create a million stories in a lifetime. It's the happy place every Saturday and Sunday for every brunching human out there. It's bliss. And it's two ingredients: sparkling wine (or champagne if you get really fancy) and OJ. Big brunch restaurants have spiced this drink up thousands of different ways, and I've maybe tried 100 different versions. I have to say though, the original is my sunshine in a glass. You just simply don't have to do too much to this drink to make it "the best mimosa ever." However, I've found fresh orange juice never hurts. And a little sweetness can make any little lady (or dude with a sweet tooth) happy. Here's a fun version that will present beautifully at any brunch party or morning gathering!

IMG_3256

IMG_3256

Grocery List:

  • 8-10 large oranges

  • 1 bottle of sparkling wine, cava, prosecco, or champagne

  • 1/4 cup of sugar

  • zest from one orange

Directions:

.

.

Step 1

Juice your oranges. You can do this by hand or with whatever juicing tool you have on hand. I simply juice mine right into a measuring cup by hand

.

.

Step 2

Pour sugar on a small plate. Zest orange into the sugar. Stir together.


.

.

Step 3:

Take an orange slice and "rim your glass" with the juice from the orange. Dip your class in the sugar-orange mixture

.

.


Step 4

Fill glass 3/4 way with the sparkling and after the bubbles settle add fresh OJ.

Easy-peasy!!!

CHEERS TO HAPPY DRINKING!!!

In Cocktails & Mocktails, Recipes, Breakfast & Brunch Tags brunch drinks, recipes, home, mothers day recipes, easy cooking, mothers day cooking, easy recipes, food network, home and garden blog, cooking at home, lifestyle blog, kitchen fun, chopped, best recipes, chef, mimosas, recipe blog, home blog, cocktails, champagne drinks, cook, cooking, home chef, mimosa recipe, brunch, kitchen, home and garden, orange juice, food porn, food blog, champagne cocktails, brunch cocktails, home cooking, mimosa recipes, cooking blog
Comment
← Newer Posts

MEET ANDREA

Hey y'all! Welcome to Andrea’s Cooktales. I’m a believer that the best stories are shared and the fondest memories are made in the kitchen, at the dinner table, and surrounded by food. This blog is about storytelling from the kitchen and the dinner table.  (Read more...)

RECENT POSTS

Featured
IMG_1079.jpg
Mar 1, 2024
Better Than a Steakhouse Filet Mignon
Mar 1, 2024
Mar 1, 2024
IMG_1267.jpg
Mar 1, 2024
Raspberry Rose Brie Bread
Mar 1, 2024
Mar 1, 2024
IMG_2041.jpg
Mar 1, 2024
Best Breakfast Burrito in Existence
Mar 1, 2024
Mar 1, 2024
IMG_2037.jpg
Mar 1, 2024
Campari Spritz
Mar 1, 2024
Mar 1, 2024
IMG_2034.jpg
Mar 1, 2024
Truffle Seafood Pot Pies
Mar 1, 2024
Mar 1, 2024
IMG_1066.jpg
Feb 4, 2024
Steakhouse Creamed Spinach Casserole
Feb 4, 2024
Feb 4, 2024
IMG_7278.jpg
Nov 9, 2023
“Season of the Witch” Salad
Nov 9, 2023
Nov 9, 2023
IMG_8931.jpg
Nov 9, 2023
Vampire Aperol Spritz
Nov 9, 2023
Nov 9, 2023
IMG_2388.jpg
Nov 9, 2023
Zombie Meat Spaghetti
Nov 9, 2023
Nov 9, 2023
IMG_4252.jpg
Nov 9, 2023
“Somebody’s Watching Me” Baked Cheese with Chile Eyeballs
Nov 9, 2023
Nov 9, 2023

ARCHIVES

Archive
  • March 2024 5
  • February 2024 1
  • November 2023 6
  • September 2023 12
  • August 2023 6
  • September 2022 1
  • February 2021 2
  • December 2020 8
  • November 2020 9
  • October 2020 4
  • September 2020 6
  • August 2020 7
  • July 2020 3
  • May 2020 2
  • February 2020 5
  • January 2020 3
  • December 2019 3
  • November 2019 4
  • October 2019 8
  • September 2019 4
  • August 2019 2
  • July 2019 6
  • May 2019 3
  • April 2019 5
  • March 2019 2
  • February 2019 2
  • December 2018 6
  • November 2018 7
  • October 2018 5
  • July 2018 1
  • June 2018 3
  • April 2018 1
  • February 2018 2
  • January 2018 10
  • November 2017 1
  • October 2017 2
  • September 2017 2
  • August 2017 1
  • July 2017 1
  • June 2017 3
  • May 2017 1
  • March 2017 4
  • February 2017 1
  • January 2017 2
  • December 2016 4
  • November 2016 7
  • October 2016 3
  • September 2016 5
  • August 2016 2
  • July 2016 4
  • June 2016 2
  • May 2016 9
  • April 2016 7
  • March 2016 7
  • February 2016 18
  • January 2016 8
  • December 2015 10
  • November 2015 14
  • October 2015 14
  • September 2015 13
  • August 2015 5
  • July 2015 6
  • June 2015 5
  • May 2015 6
  • April 2015 5
  • March 2015 6
  • February 2015 3
  • December 2014 3
  • October 2014 7
  • September 2014 6
  • August 2014 6
  • July 2014 7
  • June 2014 6
  • May 2014 6

CATEGORIES

  • TRAVEL TALES
  • LIFESTYLE POSTS
  • RECIPES
  • ANDREA'S COOKTALES
  • QUICK BITES
  • TV APPEARANCES
  • WHAT DO YOU DO WITH THAT

BLOG     |     VIDEOS     |      SERVICES    |       RECIPE INDEX    |      PRIVACY

Copyright Andrea's Cooktales 2016-2017 | Design by Oh Simple Joys Design Studio