• Cookbook
  • About
  • Video
  • Recipes
  • Travel
  • Inspiration
  • Services
  • Contact
Menu

Andrea's Cooktales

Street Address
City, State, Zip
Phone Number
A STORY BEHIND EVERY RECIPE

A STORY BEHIND EVERY RECIPE

Andrea's Cooktales

  • Cookbook
  • About
  • Video
  • Recipes
  • Travel
  • Inspiration
  • Services
  • Contact

Spinach, Smoked Mozzarella, & Crispy Prosciutto Squash Boats

September 13, 2023 Andrea LeTard

Not trying to be dramatic, but this is truly one of my new favorite recipes. And I have to admit, I have made spaghetti squash many a times and never much cared for any of the recipes. This one is a totally different story! It’s so next level, I can’t even explain. It’s a must-make!

4 servings

2 medium spaghetti squash - halved, seeds removed

2 tablespoons olive oil

Kosher salt and freshly cracked pepper

2 (8 ounce) packages frozen spinach - thawed, squeezed dry

1 cup ricotta cheese

1 cup grated smoked mozzarella + 1 cup diced

(You can also use regular mozzarella and toss in a few dashes off liquid smoke)

1/2 cup grated smoked or regular Gouda

1/4 cup apple cider vinegar

5 garlic cloves - minced

2 tablespoons minced rosemary

1/4 teaspoon grated nutmeg

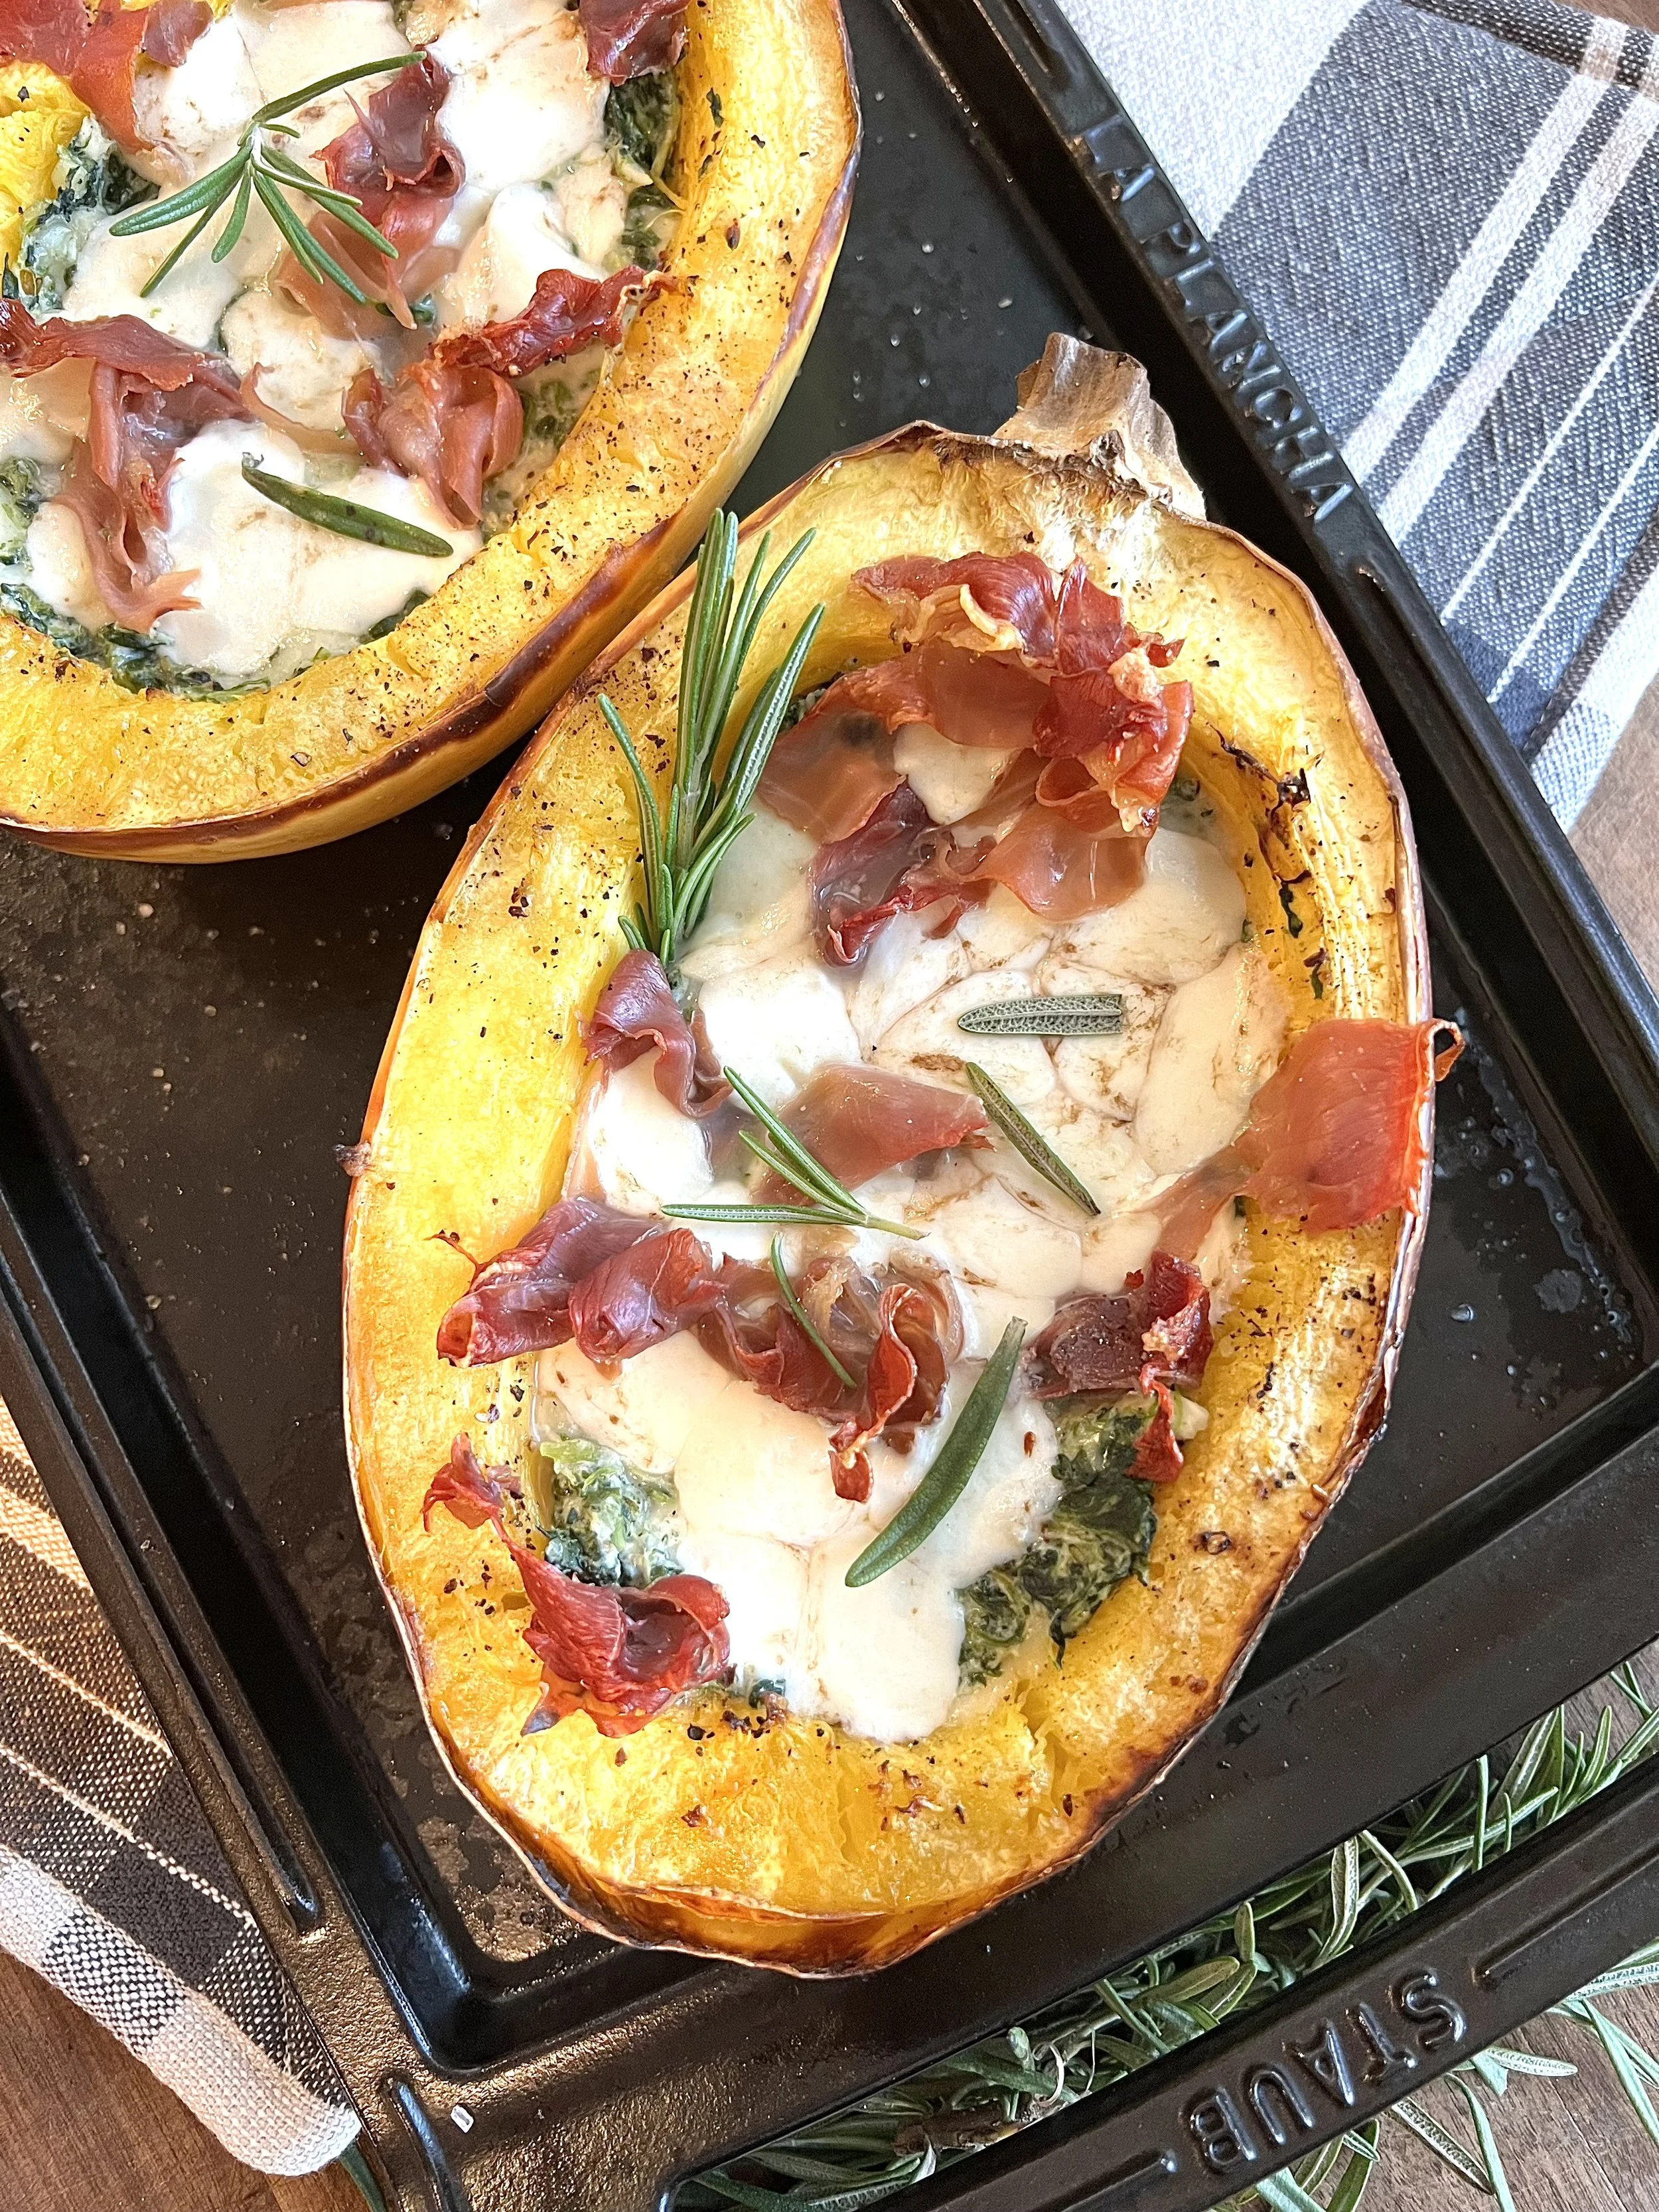
4 ounces prosciutto - cut into small pieces

Preheat oven to 425 degrees. Place the squash cut side up on a baking sheet. Drizzle the insides and tops with olive oil and sprinkle with salt and pepper liberally. Roast for 30 to 40 minutes or until soft. In a bowl, mix together the spinach, ricotta, grated smoked mozzarella, Gouda, apple cider vinegar, garlic, rosemary, nutmeg, and a heavy dash of salt and pepper. Take the pooled liquid from inside the cooked squash, pour into the mixture, and mix again until throughly combined. Fill the insides of the squash evenly with the spinach mixture, top with the diced mozzarella, and scatter the prosciutto over the tops. Bake again for 10 minutes or until cooked through and bubbly. Serve warm.

In Vegetarian, Dinner, Healthy

Spiced Maple Salmon over Brown Butter Sage Cauliflower Mash

September 12, 2023 Andrea LeTard

This cauliflower mash is in my cookbook and on my main personal chef dinner menu, so I decided to give it a little update with all fall flavors! The spiced maple salmon just adds an even cozier touch. This is a big bowl of fall goodness!

Cauliflower:

1/2 stick salted butter

1 tablespoon chopped sage + 10 whole leaves 

1 head cauliflower florets

1 garlic clove - chopped 

4 ounces fat free cream cheese  

1 teaspoon kosher salt, plus more to taste

1/2 teaspoon freshly cracked black pepper  

Salmon:

4 (5-6 ounce) filets salmon

Kosher salt & freshly cracked pepper

2 tablespoons butter

1 tablespoon maple syrup

1/2 teaspoon cinnamon

Pinch allspice

Squeeze of lemon

Heat butter in a sauté pan over medium heat and don't move. Let the butter melt. When it starts to brown around the edges, add the chopped and whole leaf sage. Remove the whole leaves with a slotted spoon to a folded paper towel as soon as they get crispy - about 30 seconds. As soon as the butter is brown and nutty, turn off the heat. This butter can be used immediately or stored in your fridge for several weeks. Steam the cauliflower in a steam basket on your stovetop until very soft. Transfer to a high speed blender with the garlic, cream cheese, salt, pepper, and 3/4 of the sage butter. Blend until completely smooth. Taste and add more salt if needed. Transfer to a bowl and set aside until ready to plate (this can also be refrigerated for up to 3 days).

Preheat your oven to broil. Season the salmon with salt and pepper on both sides. Heat a cast iron pan over medium-high heat and add the butter. Swirl around until melted and golden then add the maple syrup, cinnamon, all spice, and lemon juice and wish everything together. Place the salmon, skin side up into the pan - don’t move! Let cook 3 to 4 minutes, flip, then transfer the pan to the oven to finish cooking and get the tops of the salmon extra crispy - 4 to 5 minutes. Reheat the cauliflower mash in the microwave until piping hot. Plate the cauliflower with the salmon on top and drizzle with the remaining brown butter and whole sage leaves. 

In Seafood, Dinner

Roasted Cherry Tomato w/ Smoked Mozzarella Grilled Cheese

September 11, 2023 Andrea LeTard

One of my favorite soups of all time - no matter what season! A smoked mozzarella grilled cheese may be the best grilled cheese ever! And dipping it into this decadent soup - wow! Just wow!

1 tablespoon butter extra virgin olive oil

2 tablespoons butter

2 chopped onions

6 minced garlic cloves

1 tablespoon Italian seasoning

1 teaspoon red pepper flake

Kosher salt and freshly cracked pepper

1 large can San Marzano tomatoes

2-3 cups veggie or chicken stock

1 cup chopped basil

1 pint cherry tomatoes

8 slices bread of your choice

More butter to toast the bread

1 block smoked mozzarella - grated

Preheat oven to 450 degrees. In a soup pot, heat olive oil and butter over medium heat. Add the onion, garlic, Italian seasoning, pepper flake, and a heavy dash of salt and pepper. Cook until onions are translucent - about 5 minutes - then add the San Marzano tomatoes, 2 cups of the veggie stock, and basil. Transfer to a blender and blend or pulse until desired consistency - I like mine fairly chunky. If it’s too thick, add more stock. Transfer back to the soup pot and let simmer for at least 30 minutes - the longer it sits, the more flavorful. On a sheet pan toss together the cherry tomatoes with 1/4 cup olive oil, 1 teaspoon salt, 1/2 teaspoon pepper. Roast for 15 minutes or until blistered. Stir the cherry tomatoes and all of their liquids and seasonings into the soup. Heat a large pan or a griddle over medium-high heat. Butter one side of all the bread slices and flip over. Add the cheese evenly to 4 of the slices - the unbuttered side - and close the sandwiches with the buttered side up. Grill each side - about 2-3 minutes - or until melted and toasty. Tip: use a heavy pot lid to smash them down and cook evenly. Ladle the soup into bowls and top with more basil and extra virgin olive oil. Serve with the sandwiches. *Taste soup for seasoning before serving… if it tastes bland, more salt is most likely needed. Tomatoes need a lot of salt before tasting their best!

In Soups

Bright & Green Loaded Bean Soup

September 11, 2023 Andrea LeTard

This bright, clean, and very healthful soup is a favorite of mine! Packed with healthy greens and beans + a delicious herb sauce that goes on top, takes the flavor to an entirely new level!

1/4 cup minced basil

2 tablespoons minced mint

5 garlic cloves - 1 grated, 4 minced

1/4 cup extra virgin olive oil + 1 tablespoon

1 onion - chopped

3 celery stalks - sliced

Kosher salt and freshly cracked pepper

1/2 teaspoon red pepper flake, more to taste

2 bay leaves

4 cups vegetable broth

1 can cannellini beans - drained and rinsed

1 cup frozen lima beans

1 Parmesan rind

1 cup green beans - cut into small pieces

1 bunch asparagus - tough ends removed, cut into small pieces

2 lemons juiced

Sliced radish and grated Parmesan, for serving

Make the herb sauce by combining the basil, mint, grated garlic, and 1/4 cup of olive oil in a bowl. Set aside. Heat the tablespoon of olive oil in a heavy bottom soup pot over medium heat. Add the onion, celery, and a heavy dash of kosher salt and pepper. Cook until the vegetables are translucent - about 7 minutes. Add the minced garlic, pepper flake, and bay leaves - cook for about one minute. Add the vegetable broth, cannellini beans, lima beans, and Parmesan rind - bring to a boil then simmer for about 30 minutes. Add the green beans and asparagus and cook for about 2-5 minutes - just long enough that they’re bright green and slightly crunchy. Squeeze in the lemon juice and stir everything together. Taste and add more salt if needed. Ladle into bowls, topping with the herb sauce, sliced radish, and Parmesan.

In Soups, Healthy, Vegetarian

Kale Fennel & White Bean Soup

August 29, 2023 Andrea LeTard

This is what I call my “diet soup” or “cleansing soup.” We often have this soup at the beginning of the week after a weekend or a vacation of bad eating. There’s so much flavor without adding fat or anything unhealthy! All clean, healthful goodness!

2 tablespoons extra virgin olive oil

1 yellow onion - diced

1 fennel bulb - diced

3 celery stalks - diced

1 carrot - diced

3 garlic cloves - minced

1/2 teaspoon red pepper flake

Kosher salt and freshly cracked pepper

1/4 cup store-bought basil pesto

2 cans cannellini beans - drained and rinsed

4 cups vegetable or chicken broth

1 parmesan rind

1 bundle Tuscan kale - stems removed, chopped

1 lemon - zested and juiced

Freshly grated parmesan, for serving

Heat olive oil in a soup pot over medium heat. Add the onion, fennel, celery, carrot, garlic, pepper flake, and a heavy dash of salt and pepper. Cook until vegetables are translucent- about 5 minutes. Stir in basil pesto and let cook into the vegetables for about 2 minutes. Add the cannellini beans with a heavy dash of salt and pepper, broth, and parmesan rind. Bring to a boil and simmer for at least 30 minutes to get all the flavor possible out of the rind - the longer it simmers, the more flavorful. Before serving, add the kale a little at a time, letting the leaves wilt down before adding more. Tip: as you add the kale each time, sprinkle with a little bit of salt - this helps flavor the soup as you go and the leaves wilt down quicker. Finish with the lemon zest and juice. Serve in bowls topped with Parmesan and a drizzle of olive oil.

In Vegetarian, Soups, Healthy

Cheesy Tomato Basil Tortellini

August 28, 2023 Andrea LeTard

This is like the best baked pasta you’ve ever had - only in soup form! It’s hearty, decadent, cheesy, and creamy with a ton of light summer freshness throughout from the tomatoes and fresh basil. This soup is next-level stuffs you’re going to love it!

2 tablespoons olive oil

1 large onion - diced

Kosher salt and pepper

5 garlic cloves - minced

1 tablespoon fennel seed

2 teaspoons Italian seasoning

1/2 red pepper flake, or to taste

8 ounces sliced mushrooms

1 pound whole cherry or chopped heirloom tomatoes

3 tablespoons tomato paste

1 (28 ounce) can San Marzano Whole Peeled tomatoes

4 cups vegetable broth

1 pound store-bought tortellini

1/2 cup chopped basil leaves + more for serving

6 ounces shredded mozzarella

2 ounces shredded Parmesan, plus more for topping

8 ounces ricotta + more for serving

Heat olive oil over medium-low heat. Add the onion with a heavy dash of kosher salt and pepper. Cook until onion is translucent - about 4 minutes. Add the garlic, fennel seed, Italian seasoning, and pepper flake. Cook for one minute. Add the mushrooms with a heavy dash of salt and pepper - cook for about 5 minutes. Add the tomatoes with the tomato paste and another dash of salt and pepper - cook for about 4 minutes. Add the San Marzano tomatoes, breaking them up with a spoon until desired consistency. Pour in the broth, bring to a boil, simmer, then add the tortellini. Cook according to the package directions - usually about 4-5 minutes. Stir in the chopped basil, mozzarella, parmesan, and ricotta. Serve immediately in bowls, topped with more ricotta and basil if desired.

In Soups, Vegetarian

Zucchini and Quinoa Greek Lemon Soup

August 27, 2023 Andrea LeTard

A fun, healthy take on the traditional Greek Lemon Chicken soup! The egg adds creaminess without too much unnecessary fat and the lemon gives such a fresh, happy brightness.

1/4 cup extra virgin olive oil

1 small yellow onion - diced

1 cup diced celery

1/2 cup diced carrots

3 green onions - sliced

Kosher salt and freshly cracked pepper

1 zucchini- chopped

4 garlic cloves - minced

2 bay leaves

1 teaspoon dried oregano

1/2 cup quinoa

4 cups chicken or vegetable stock

2 eggs

1 teaspoon lemon zest

2 lemons - juiced

Parmesan

Feta

Parsley

Heat olive oil in a soup pot and add the yellow onion, celery, carrots, and green onion with a sprinkle of salt and pepper. Cook until veggies are slightly soft - about 5 minutes. Add the zucchini, garlic, bay leaf, and oregano with another sprinkle of salt and pepper. Cook until slightly soft - about 5 minutes. Add the quinoa and stock. Bring to a boil and simmer until quinoa is cooked through - about 10 to 15 minutes. While quinoa is cooking, in a separate bowl add the eggs, lemon zest, juice, and a sprinkle of salt and pepper. Whisk together until smooth. When quinoa is cooked and soup is hot, add a couple of ladles of soup into the egg mixture and whisk together to temper the eggs. Add the egg mixture to the soup and stir together with two handfuls of Parmesan. Spoon into bowls and top with more Parmesan, Feta, and parsley.

In Soups, Recipes, Vegetarian

Summer Squash & Parmesan Chowder

August 26, 2023 Andrea LeTard

Think of your favorite chowder but full of end of summer veggies fresh from the garden. This soup gives both the lightness of summer and the heartiness of fall.

3 slices of bacon - chopped

1 tablespoon butter

1 onion - diced

4 garlic cloves - minced

2 chipotle peppers in adobo sauce - minced

1 teaspoon fresh thyme leaves (1/2 teaspoon dried)

Kosher salt and freshly cracked pepper

1 pound yellow squash - cubed

2 ears corn - kernels shaved off the cob

1/3 cup all-purpose flour

4 cups chicken or vegetable stock

1 cup of milk or half and half

1 1/2 cups freshly grated parmesan, plus more for serving

Heat a soup pot over medium heat. Fry the bacon until crisp then set aside to drain on a paper towel lined plate. Add butter to the pot with the bacon grease and cook the onion, garlic, peppers, and thyme with a heavy dash of salt and pepper until translucent - about 4 minutes. Add the squash and corn with another heavy dash of salt and cook until squash starts to soften - about 10 minutes. Add the flour and cook for a few more minutes - this gets the raw taste out of the flour and thickens the soup. Add the stock and milk. Bring to a boil and simmer. When ready to serve, stir in the parmesan. Taste for seasoning and add more salt and pepper if needed. Ladle into soup bowls and serve with more parmesan and bacon bits.

In Recipes, Soups, Vegetarian

Shrimp ‘N Sausage Jambalaya Soup

August 25, 2023 Andrea LeTard

Taking traditional, hearty comfort dishes and turning them into soups is one of my favorite ways to spin a recipe. If you love soup (and seafood) as much as I do, this “soupy” take on a classic Cajun dish will become one of your favorites this fall.

1 tablespoon + 1 1/2 teaspoons Cajun seasoning

1/2 pound unpeeled, tail-on shrimp

1/4 cup extra virgin olive oil

1 red or orange bell pepper - seeded + chopped

1 green bell pepper - seeded + chopped

1/2 pound fresh tomatoes - chopped

5 scallions - sliced, plus one for garnish

Kosher salt and freshly cracked pepper

4 garlic cloves - minced

1 teaspoon fresh thyme leaves

1 bay leaf

1/2 pound andouille sausage - sliced

1/4 cup tomato paste

2 cups chicken stock

1/2 cup uncooked white rice

2 tablespoons minced parsley

Sliced lemons, for serving

Bring 4 cups of water and the tablespoon of Cajun seasoning to a boil. Add the shrimp and cook for about 2 minutes or just until the shrimp turns pink and the tails curl. Using a slotted spoon, remove the shrimp and set aside to cool. When the shrimp cool, peel them. Save the shrimp water - DO NOT DUMP - you’ll use it as stock later. This gives your soup the best fresh seafood taste - you don’t want to skip this part!

In a soup pot, heat the olive oil over medium-high heat. Add the bell peppers, tomatoes, and scallions with a heavy dash of salt and pepper. Cook until the veggies soften - about 8 minutes. Add the garlic, thyme, and bay leaf. Cook for one minute. Add the sausage and sauté for a few minutes. Stir in the tomato paste until combined. Pour in the chicken stock and 2 cups of the leftover boiled shrimp water. Add the rice and bring to a boil. Simmer until rice is cooked - about 15 minutes. Stir in the parsley. Taste and add more salt and pepper if needed. Serve in bowls, topped with the peeled shrimp, sliced scallions, and sliced lemons.

In Soups, Recipes, Seafood

Stuffed Bell Pepper Soup

August 24, 2023 Andrea LeTard

If you’ve ever had a stuffed pepper, just imagine it in soup form - even more cozy and comforting. I include lots of Italian ingredients in this recipe to make it extra delicious!

1 tablespoon olive oil

1 pound ground meat of your choice

Kosher salt and freshly cracked pepper

1 onion - diced

1 red bell pepper - diced

1 orange bell pepper - diced

1 green bell pepper - diced

1 fennel bulb - stalks removed, diced

4 garlic cloves - minced

1 teaspoon Italian seasoning

1/2 teaspoon red pepper flake

1 (28 ounce) can San Marzano tomatoes

1 (8 ounce) can tomato sauce

2-3 cups chicken or vegetable stock

1 1/2 cups cooked brown or white rice

*this amount is 1/2 cup of uncooked

3 cups spinach

2 tablespoons fresh minced parsley

1 cup shredded mozzarella and/or Parmesan

Heat olive oil in a soup pot over medium-high heat. Add the meat with a dash of salt and pepper. Cook until browned - about 8 minutes. Add the onion, bell peppers, and fennel with a heavy dash of salt and pepper. Cook until all veggies are softened - about 5 minutes. Add the garlic, Italian seasoning, and pepper flake - cook for one minute. Add the San Marzano tomatoes and mash them up with the back of a spoon. Add the tomato sauce and stock. Bring to a boil and simmer. When ready to serve add the cooked rice, spinach, and parsley. Taste for seasoning and add more salt and pepper if needed. Serve in bowls with lots of mozzarella and Parmesan! I do about 1/4 cup cheese per bowl!

In Soups, Recipes

Andrea’s Cooktales: A Keepsake Cookbook

September 15, 2022 Andrea LeTard

“My Goal with this book was quality over quantity - these are tried and true recipes. They've all been tested over and over and over again. Every recipe in this book is a staple in my kitchen and in my client’s homes - this is food I could cook a million times over and never get sick of - my friends, family, and clients agree and I think yours will too!"

ORDER TODAY!

Foodie Baby 101: An American Chef Feeding My Baby Like the French

February 18, 2021 Andrea LeTard
Photo by Abbey Bratcher - @abbeybratcherphoto, Home: Pettigrew Adventures

Photo by Abbey Bratcher - @abbeybratcherphoto, Home: Pettigrew Adventures

We have been giving Xav solids now for a few weeks and I wanted to share the full journey and schedule. If you’ve been following along, you’re aware of my obsession with the way the French feed their children and wanting to mimic it to the best of my ability. They emphasize “taste development” at a very early age and have their kids eating any and all veggies and even what many Americans would consider “grown up foods.” And here’s the biggest catch: the kids actually like them! This way just seems to make the most sense to me if wanting to raise a “foodie baby” who will eat just about anything. 

 I’ve been following French baby food recommendations and have done a lot of research on the FSP (French Society of Pediatrics) vs the AAP (American Academy of Pediatrics). ***I am not a doctor or an expert - this is all research mixed in with what our pediatrician has also recommended - I just want to share my bebe’s food journey with y’all because that’s what I do, I talk about food!*** I posted a bit about this already (saved on highlights on Instagram @andreas_cooktales under 🇫🇷Baby Food🇫🇷 if you missed it). After I posted, I got a lot of questions, so I want to take y’all from start to finish on our baby food plan, why, and how it’s been going so far. 

As always, I will emphasize: the plan YOU have for YOUR baby will always be the best plan. I just want to share mine per all my French research.  I’m not saying it’s THE way. This is just what we plan to do. I’m super passionate about it so I’m hoping it goes well. If it doesn’t work out, I will let y’all know.. Believe me! I’m going to be very transparent about this and share every step of it with y’all. As I put these ideas into action, I will be posting reels, videos, and additional blog posts about it. I would love for y’all to go on this journey with me. Even if some of my choices aren’t for you, I hope you follow along and share what you’re doing. I love hearing all the different ways yalls babies are eating. Here’s the breakdown of what we’re doing: 

IMG_3151.jpeg

🍴We are starting with homemade purées rather than cereal. I’ve read a lot of research on cereal first vs. purées first and that’s what I decided. My reasons vary but the gist is little nutrition in the cereal, more substance and health benefits in veggies, and according to the French the sooner you introduce a variety of veggies increases the likelihood of them enjoying them.

🍴We are starting purées at 5 1/2 months. It sounds late, but it’s what my research told me and it was backed up by my pediatrician who said standard recommendation is 5-6 months so we are going the halfway mark. 

🍴Our feeding schedule looks similar to the one I posted from the book “French Kids Eat Everything” (you can find that post on my Instagram highlights under 🇫🇷Baby Food🇫🇷) and will continue to look like that until 9 months. At that mark, we will go full-blown FSP recommendation, which the AAP may not agree with - 4 meals a day (breakfast, lunch, snack, dinner) and stick to it rigorously. Here’s why:

IMG_2925_jpg.jpeg
  • The French don’t believe in walking around with snacks in your bag.

  • Structure and routine.

  • Sitting and enjoying meals together.

  • They don’t believe in children telling them when they want a snack or when they should eat. The child doesn’t decide when he eats. The parent does. The parent is always in charge - even when it comes to food.

  • Being hungry when they sit down makes them “good eaters.” If they’ve had snacks all day, they won’t eat at mealtime and they certainly won’t eat vegetables or try new foods.

  • When they sit down to eat they’re truly hungry, therefore, they’re excited to eat whatever you’re serving them. Not to mention, being hungry turns them into little adults at the table. According to the French, when a child is genuinely hungry, he’s less likely to act up, throw food, or pitch a fit at the table.

  • 4 meals a day teaches patience and again, structure. Patience - If a child is given a snack each time he says he’s hungry, he will never learn patience and appreciation for food. Structure - He will know if he doesn’t eat enough at breakfast, he’s not going to be able to eat again until lunch, therefore, he will more than likely eat his entire breakfast. Likewise, he will do the same at every meal because he knows a snack isn’t an option.

  • Food is not a bribe, reward, or distraction. Rather, food is something to look forward to, throughly enjoy, and savor.

IMG_4082.jpeg
Photo by Abbey Bratcher, Home: Pettigrew Adventures

Photo by Abbey Bratcher, Home: Pettigrew Adventures

These tips all come from the two books I’ve read on this: “Bringing Up Bebe” and “French Kids Eat Everything” + additional research I’ve done online. I’m not saying it’s THE way. This is just what we plan to do. I’m super passionate about it so I’m hoping it goes well. 

Update: We started purées with Xav a few weeks ago and this has been the schedule, amounts, and foods: 

  • All pure veggies - no salt, no fat, and all on their own (you can also mix with a little potato for smoother consistency)

  • A few bites then milk right after - we’ve done maybe 2 to 3 teaspoons so it’s very underwhelming at first, I kept thinking “this is not even real eating” haha! But a baby has never had food before, so it takes time.

  • Purées at lunch - we decided on lunchtime in case his belly doesn’t agree with something. That way, he doesn’t go to bed with an upset stomach. We’ve not run into this problem though. I’m sure dinner time is fine too.

  • Harsh veggies first, sweeter veggies later - we went with greens first and then will ease into the veggies babies tend to like best. I read the French do this to get their tastebuds used to green veggie flavors so they don’t fall in love with the sweet stuff first and refuse the greens later.

  • Introduce a new veggie every 3 to 4 days (about 6 veggies the first month) - I’m strictly following what I’ve read the French recommend doing here. It’s all about “taste development” to them and they believe (and statistically are right in most cases) this gets your baby liking and eating all foods at a young age.

IMG_4513.jpeg

Our Schedule Thus Far and How It’s Been:

Week 1: “Vegetable Soup”

I read to warm up babies taste buds to vegetables, they do a veggie soup in their bottle first (just a few tablespoons mixed with milk). This “vegetable soup” is actually just really a broth or juiced veggies. I made mine with carrot, celery, a tiny amount of onion, and a lot of water. When veggies were soft, I blended everything up very smooth then took a strainer lined with fine mesh cloth and strained it into a juice. I wanted to make sure there were no chunks whatsoever for safety reasons. Verdict: he wasn’t a fan of it in his bottle with milk so we ended up spoon feeding it to him. 

IMG_4565.jpeg

Week 2 and 3: Real Solids 

*I homemade these myself using a baby food maker. You can also just steam them and purée very smooth in a high-speed blender. 

Day 1, 2, 3: Spinach 

Day 4, 5, 6, 7: Zucchini 

Day 8, 9, 10: Green Beans

Day 11, 12, 13, 14: Turnip Root

IMG_4566.jpeg

*So far he hasn’t “loved” anything - haha! I’m just being honest. He’s still at the stage where I don’t think he understands why there’s food in his mouth and he’s not drinking milk! I say to him after each bite, “Xav, you can’t drink milk for your entire life.” I would say so far, zucchini and green beans have been his favorite (kind of not really - ha!), he’s “put up” with spinach, and he literally projectile vomited when I fed him turnip yesterday (He had just had a bottle so maybe that’s why. By the way, I usually always give food before bottle and I plan to keep it that way, he was just really hungry when he woke up so I shoved a bottle in his mouth). According to the French, this is normal and you keep trying. They say it takes 7 or 8 times before they can actually decide they like something or not. 

IMG_4578.jpeg

Week 4: 

Day 15, 16, 17: Leeks

Day 18, 19, 20, 21: Carrot 

We haven’t gotten to week 4 yet but I’ll update y’all as soon as we do. Once we’re done with these, we will circle back to the spinach and start the whole process over again. Then most likely move on to sweeter veggies and some fruits. I’ll keep these detailed posts coming. Until then, find more info on my Instagram page @andreas_cooktales 

In Inspiration

Food Network Supermarket Stakeout Winner

February 7, 2021 Andrea LeTard
IMG_2451.jpeg

Watch me win Food Network’s Supermarket Stakeout Season 2 “Toast the Competition” here:

https://watch.foodnetwork.com/tv-shows/supermarket-stakeout

Comment

Holiday “Pot Roast” Ravioli

December 21, 2020 Andrea LeTard
IMG_0964.jpeg

While I can’t give up my family’s most prized recipe, this is a version of it I would like to share with y’all. If you’ve never heard the story of how my cooking career got started, this recipe had a lot to do with it. I’d like to share that with y’all too! Years ago, in my late 20’s - before I ever cooked a thing - my grandmother gave me the family heirloom cookbook with recipes passed from so many generations back, some recipes in this book are from the late 1800’s. One of those recipes is called Holiday Ravioli and we had it at Christmas every year. This ravioli was beyond… when I say the best ravioli ever, I mean the BEST EVER. I always looked forward to it every Christmas. When she gave me the cookbook, I hadn’t been to her house for Christmas in a few years, so I wanted to make that ravioli so bad. I literally couldn’t wait to eat it again. I had never really cooked anything aside from grilling chicken and throwing a few veggies in the oven, and this recipe was not an easy one. Everything is made from scratch - from the pasta dough, to the filling, to the sauce. I decided to just go for it. Well of course, I had nothing I needed in the kitchen to make this dish, including a rolling pin. I ended up using a wine bottle to roll the pasta dough out - because we always had a wine and it was the closest thing I had to a rolling pin - haha! This ravioli dish came together so effortlessly for someone who never spent time in the kitchen, and the finished product was just delicious! I couldn’t believe I pulled it off, and that’s when the cooking bug bit me. I fell in love with being in the kitchen after making this recipe, and soon after, cooking became my life! My very first pasta dough, rolled out with a wine bottle, and to this day, homemade pasta is my favorite dish to make! This dish is a simplified version of it you can pull together at the last minute. You don’t have to homemake the ravioli (unless you want to) and the sauce cooks in a slow cooker or a instant pot and in a snap, it’s done!

2 tablespoons olive oil 

1 (2 - 3 lb) boneless chuck pot roast 

Kosher salt and freshly cracked pepper 

1 pound sliced mushrooms 

1 (28 oz) can San Marzano peeled tomatoes - crushed by hand 

1 (6 oz) can tomato paste 

6 garlic cloves - minced 

1 cup chopped basil

2 teaspoons minced parsley 

1 bay leaf 

1.5 to 2 pounds frozen ravioli- spinach and cheese preferably or whatever kind you like


Heat olive oil in a large pot or sauté pan over medium high heat. Generously salt and pepper all sides of the roast - about 1 tablespoon of salt and 2 teaspoons pepper. Place the roast in the pot and brown on all sides. Transfer the meat and all the liquid from the pot to a slow cooker or instant pot and add the mushrooms, tomatoes, tomato paste, garlic, basil, parsley, and bay leaf. If using a slow cooker, cook for 4 hours on high heat or 8 hours on low heat - or until roast is completely broken down. If using an instant pot, cook on the high setting for about one hour or until roast is completely broken down (all instant pots are different so use the setting that makes the most sense). When finished cooking, use a fork to shred the meat right inside the sauce. Stir together until combined. Taste and add more salt if needed. Boil ravioli according to package directions. Top with all the meat sauce and serve warm. 

Feast of the Seven Fishes

December 18, 2020 Andrea LeTard
IMG_1051.jpeg

I’ve wanted to write this blog post for several years but finally got around to gathering the perfect seafood recipes for yall. Though we aren’t Italian, we have celebrated the Feast of the Seven Fishes in some way every December. Traditionally, it’s meant to be celebrated Christmas Eve, but I find any excuse to eat a ton of seafood the perfect dinner party theme. Seafood is elegant, fancy, and sometimes a little more high-dollar than the traditional meal so it’s perfect for a Christmas celebration. As they always do when it comes to food, I think the Italians truly have this one figured out. I can’t think of a better way to celebrate Christmas Eve!

Here are some things to know about Feast of the Seven Fishes:

-       It’s a very common, traditional, old school Italian Christmas Eve Celebration.

-       Though it’s called Feast of the Seven Fishes, sometimes even more fish, shellfish, seafood are consumed. Many Italians may serve 8, 9, 10+ fish dishes!

-       There are several different stories of how it came about or why it’s celebrated: some say it’s symbolic of the seven sacraments of the Catholic Church, others say it was started as a way to fast and go meat-free before the bog meal on Christmas Day.

-       Not every Italian celebrates it the same, it varies from family to family, and not all Italians do this on Christmas Eve. Just like everywhere else, every family has their own different traditions.

IMG_1061.jpeg

Here’s why it’s the perfect Christmas Eve or Holiday Dinner Party celebration:

-       Christmas food can sometimes seem repetitive of Thanksgiving. This changes things up a bit.

-       If you’re a seafood lover (and I hope you are), there is truly no better meal than sitting down for a literal feast of fish and shellfish!

-       Seafood is light, clean, and mostly healthy so you will go into Christmas day ready to eat big and heavy.

-       Seafood is hands-down the quickest, easiest, simple type of food to cook and serve.

-       Aside from the actual fish, you only need a few ingredients (most of which you probably have on hand) to cook seafood: butter, olive oil, garlic, herbs, lemon, salt. So, it’ll be the easiest grocery trip you’ve ever had for a big gathering!

-       You don’t have to do a full seven dishes to host Feast of Seven Fishes. Just put several different seafoods in a few dishes.

-       Seafood cooks fast and sits well at room temperature so most of this can be cooked ahead.

-       A lot of seafood can be refrigerated before serving (tuna dip, shrimp cocktail) so half of the meal/appetizers can be made early.

-       Seafood can be cooked multiple ways grill/stovetop/oven – so you can have several dishes cooking at once, ready to be put on the table all at once.

-       There is nothing that will make families linger longer at a dinner table laughing, talking, and carrying on than picking at a whole fish. When there’s a big, whole fish at the table, you have to pick the bones out while eating it, so you eat slower, talk longer, and have more fun together!

-       Seafood is simply the best! It’s easy to deal with, however it’s extremely elegant, sometimes a little more expensive, so it’s truly the perfect Christmas meal!

IMG_1056.jpeg


Here are some of my favorite things to serve for Feast of the Seven Fishes:

Easiest Whole Red Snapper

IMG_1074.jpeg


Garlic Head-On Shrimp

IMG_1044.jpeg


Southern Belinis with Smoked Trout and Maple Crème Fraiche

IMG_1594.jpeg

Shrimp Cocktail with Green Goddess Dressing

IMG_1595.jpeg


Tuna Skewers with Mojito Sauce

IMG_1596.jpeg


Seafood Pasta with Smoked Oysters

IMG_1598.jpeg


Shrimp Puttanesca with Angel Hair

IMG_1597.jpeg


Smoked Oyster Bites

IMG_1599.jpeg


Balsamic Salmon with Tomato Avocado Salad

IMG_1601.jpeg


Caribbean Seared Tuna with Mojito Sauce

IMG_1600.jpeg


Squid Ink Spaghetti with Garlic Anchovy Sauce and Toasted Breadcrumbs

IMG_1072.jpeg


Lemon Capellini with Clams

IMG_1080.jpeg


Simple Lemon Anchovy Salad

Provence Salad.jpeg


Tuna Salad on Crostini

IMG_1037.jpeg

Simple Lemon Anchovy Salad

December 18, 2020 Andrea LeTard
Provence Salad.jpeg

Even for the person who thinks they hate anchovies - this is the perfect salad. Trust me with the anchovy paste. Once you use it once, you’ll use it in so much of your cooking s salt replacement. It’s truly the BEST way to flavor food without using salt. Truly truly. Trust me. Trust me. Trust me. It’s one of the best ingredients ever! This salad is clean and fresh and the croutons are so flavorful. It’s a simple yet perfect salad!

Croutons:

1/4 baguette - cut into small cubes

2 tablespoons olive oil 

1 teaspoon fennel seeds

1/2 teaspoon kosher salt

1/2 teaspoon dried oregano 

Dressing:

1 teaspoon anchovy paste or minced anchovies 

1/2 teaspoon Dijon mustard

1 garlic clove - grated or finely minced 

1/4 cup Meyer lemon juice 

1/2 cup good quality olive oil

Salad:

Mixed greens 

1/2 cup shaved Parmesan 


Preheat oven to 400 degrees. On a sheet pan, toss together the bread cubes, olive oil, fennel seeds, salt, and oregano. Bake for about 10 minutes or until golden and crispy. In a small bowl, whisk together the anchovy paste, Dijon, garlic, lemon juice, and olive oil. To a salad bowl, add the mixed greens, croutons, and shaved Parmesan. When ready to serve, pour dressing over the top and toss everting together until combined. 

Squid Ink Spaghetti with Garlic Anchovy Sauce and Toasted Breadcrumbs

December 18, 2020 Andrea LeTard
IMG_1072.jpeg

A beautiful dish with a lot of flavor - this will be a family favorite! If you’re not an anchovy person, don’t let that alarm you - the anchovies in this dish are merely there for the salty flavor they give. Plus, they’re minced so tiny you won’t even know they’re there. You may be shocked at how many restaurants use anchovies for their unique salty flavor. If you think you don’t like anchovies, you may be surprised at how many times you’ve actually had them without even knowing. They give a flavorful saltiness not even the best salt can give! 

1 pound black (squid ink) spaghetti 

1/2 cup good quality olive oil + 2 tablespoons 

5 garlic cloves - minced or grated 

4 anchovies - minced finely into a paste 

1/2 teaspoon red pepper flake + more to taste 

1/2 cup grated Parmesan 

1/2 cup panko breadcrumbs 

Bring a large pot of very salty water to a boil. Boil spaghetti according to package directions or until al dente. While pasta is boiling, heat the 1/2 cup of olive oil over low heat in a large sauté pan. Add the garlic, anchovies, and pepper flake. Sauté for about one minute or until fragrant. Take off the heat so the garlic doesn’t burn. When the spaghetti is ready, using tongs, immediately transfer to the sauce. Add about 1/2 to 1 cup of pasta water and Parmesan. Toss together until combined and creamy - add more pasta water as needed if spaghetti gets dry. In a small sauté pan, add the remaining 2 tablespoons of olive oil and the breadcrumbs over medium heat. Toss together until golden in color (breadcrumbs can also be made ahead and stored in a container on the counter up to a couple of days before). Serve breadcrumbs atop the spaghetti. 

Lemon Capellini with Clams

December 18, 2020 Andrea LeTard
IMG_1080.jpeg

This recipe is a simple, clean, and healthy way to enjoy pasta. The aroma of lemon is delightful and the creamy olive oil makes it decadent without being too heavy. It’s also the perfect elegant dish to impress dinner guests!

1/2 cup olive oil

3 garlic cloves - thinly sliced by mandoline 

1/4 teaspoon red pepper flake 

Kosher salt and freshly cracked pepper 

1/4 cup white wine 

2 pounds clams - scrubbed clean 

1 pound capellini or angel hair pasta 

4 lemons - zested and juiced 

1/2 cup grated Parmesan 

Bring a large pot of heavily salted water to a boil. In a large, deep sauté pan, add the olive oil and heat over low heat. Add the garlic, pepper flake, and a heavy dash of salt and pepper. Cook for one minute or until fragrant. Add the wine and bring to a boil. Lower the heat to a simmer, add the clams, and cover the pan with a lid. Cook, covered, until clams have opened up - about 7 minutes. Discard any clams that didn’t open. Boil pasta in the large pot of water for about 2 to 3 minutes or until al dente. Using tongs, transfer the pasta directly into the pan with the clams with about 1/4 to 1/2 cup of pasta water. Add the lemon zest, juice, and Parmesan. Toss everything together and serve warm or at room temperature. Add more pasta water if the pasta noodles get dry or clumpy while sitting. 

Easiest Whole Roasted Red Snapper

December 18, 2020 Andrea LeTard
IMG_1074.jpeg

Whole roasted fish is the easiest, healthiest, quickest meal to cook! Plus, who doesn’t love picking at a fish for hours at the dinner table? When you eat whole fish, you have to watch for bones so it forces you to eat slow, enjoy the sips of wine in between bites, and savor every moment at the dinner table with family and friends!

1 whole large red snapper - gutted, cleaned, scaled 

Kosher salt and freshly cracked pepper 

2 lemon slices + 1 lemon for serving 

2 stems rosemary + more for garnish 

1 teaspoon cumin

1 teaspoon garlic powder

1 teaspoon coriander 

Good quality, fruity olive oil 

Preheat oven to 425 degrees. Rinse and pat the snapper dry and place on a baking sheet. Cut 3 slits on each side of the fish. Salt and pepper the cavity (belly) and both sides generously, pressing to adhere. Stuff the cavity with lemon slices and rosemary. In a small bowl, mix together the cumin, garlic powder, and coriander. Sprinkle on both sides of the fish, pressing to adhere. Drizzle olive oil generously over the top. Place in the oven and roast for about 25 to 30 minutes or until cooked through and easy to flake with a fork. Serve whole with more olive oil drizzled atop and fresh squeezed lemon juice. Garnish with rosemary if desired. 

French Escargot 3 Ways

December 9, 2020 Andrea LeTard
IMG_0551.jpeg
IMG_0561.jpeg

Escargot is a very common bite of food in France - as a matter of fact, I can’t think of many restaurants I’ve been to in France that didn’t have it on their menu in some form. Unfortunately, sometimes these little bites of goodness are very misunderstood in the US. Maybe it’s because we didn’t grow up eating it? Maybe it’s because it’s not menus at most restaurants? Either way, I’m here to tell y’all, we missed out! “Snails” may not sound like the most appetizing food but I’m here to tell you, THEY ARE! I went to Paris many years ago and fell completely and utterly in love with them. 

They’re truly one of my favorite foods that I tend to only make at home for very special occasions. That’s why they’re perfect for the holidays! And I’m here to help you fall in love with them if you think you’ve never liked them before. They’re traditionally served in individualized ramekins as a starter or first course - served with a side of bread to dip in the garlic, butter goodness! Unless you’re the biggest escargot fan in the world, I’ve never seen the point in purchasing a bunch of these. I like serving them as small bite appetizer. Or even better, I show you here how to make your own ramekin out of bread - combining the traditional way + the side of bread normally served on the side. 

So what are escargot like and why will you love them? I’ll start with why you’ll love them. Three words: garlic, butter, bread, and sometimes Parmesan cheese. That’s pretty much what the dish is made up of with a little addition (the escargot itself). The texture can be described like a mushroom - as a matter of fact, we went to a restaurant once in Carmel, CA that had “vegetarian escargot” on the menu, and the only difference was a mushroom replaced the snail. I promise, there’s nothing like them and once you try one, you’ll be addicted! Finally, another reason to love them: they’re such an elegant, fancy dish to serve that will throughly impress dinner guests and they’re quite inexpensive! I buy the canned version and they’re right around $5 a can. You can also purchase the snail shells separately at certain stores (or I’ve heard order them online) if you want to serve them extra traditional! These three recipes require no shell. So, did I sell you on them? I certainly hope so because if I didn’t you will definitely be missing out! 

Basic Butter Recipe:

*This is enough for 24 escargot - the standard amount in a can. You can use all of this for one of the three ways or split them in thirds for samples of all three. Whatever floats your boat!

2 sticks salted butter - softened 

1/3 cup roughly chopped shallots 

1/4 cup cup parsley leaves - chopped 

4 garlic cloves - chopped

Pinch salt and pepper 

Place the butter, shallots, parsley, garlic, salt, and pepper in a food processor. Process until the mixture comes together and everything is finely minced into the butter. Set aside or refrigerate until ready to use. If refrigerated, bring to room temperature to soften before using. 

Way 1: Bread “Ceramics”

IMG_0539.jpeg

4 flatbreads or focaccia cut into fourths 

1 can (24 count) escargot 

Butter mixture 

Parmesan 

Preheat oven to broil. Place bread “dishes” on baking sheets. Using a tiny circular cookie cutter or a sharp knife, lightly cut 5 to 6 circles (each big enough to fit a snail) in the top of the bread - be sure to not go all the way through - then scoop the top layer of the bread off each circle. The circles should be should be like tiny, little bread bowls. Place a snail in each hole and cover with butter mixture - you can even spread the extra butter all over the bread around each hole. Sprinkle Parmesan over the top and broil for a few minutes until brown and bubbly. 

Way 2: Crostini 

IMG_0553.jpeg

24 crostini

1 can (24 count) escargot 

Butter mixture 

Parmesan 

Preheat oven to broil. Line the crostini on a baking sheet. Place a snail on each crostini and cover with a large dollop of the butter mixture (approximately 1/2 tablespoon). Lightly sprinkle with Parmesan cheese and broil for a few minutes until Golden and bubbly. 

Way 3: Phyllo Cups

IMG_0551.jpeg

24 phyllo cups

1 can (24 count) escargot 

Butter mixture 

Parmesan 

Preheat oven to broil. Line the phyllo on a baking sheet. Place a snail on each and cover with a large dollop of the butter mixture (approximately 1/2 tablespoon). Lightly sprinkle with Parmesan cheese and broil for a few minutes until Golden and bubbly. 

← Newer Posts Older Posts →

MEET ANDREA

Hey y'all! Welcome to Andrea’s Cooktales. I’m a believer that the best stories are shared and the fondest memories are made in the kitchen, at the dinner table, and surrounded by food. This blog is about storytelling from the kitchen and the dinner table.  (Read more...)

RECENT POSTS

Featured
IMG_1079.jpg
Mar 1, 2024
Better Than a Steakhouse Filet Mignon
Mar 1, 2024
Mar 1, 2024
IMG_1267.jpg
Mar 1, 2024
Raspberry Rose Brie Bread
Mar 1, 2024
Mar 1, 2024
IMG_2041.jpg
Mar 1, 2024
Best Breakfast Burrito in Existence
Mar 1, 2024
Mar 1, 2024
IMG_2037.jpg
Mar 1, 2024
Campari Spritz
Mar 1, 2024
Mar 1, 2024
IMG_2034.jpg
Mar 1, 2024
Truffle Seafood Pot Pies
Mar 1, 2024
Mar 1, 2024
IMG_1066.jpg
Feb 4, 2024
Steakhouse Creamed Spinach Casserole
Feb 4, 2024
Feb 4, 2024
IMG_7278.jpg
Nov 9, 2023
“Season of the Witch” Salad
Nov 9, 2023
Nov 9, 2023
IMG_8931.jpg
Nov 9, 2023
Vampire Aperol Spritz
Nov 9, 2023
Nov 9, 2023
IMG_2388.jpg
Nov 9, 2023
Zombie Meat Spaghetti
Nov 9, 2023
Nov 9, 2023
IMG_4252.jpg
Nov 9, 2023
“Somebody’s Watching Me” Baked Cheese with Chile Eyeballs
Nov 9, 2023
Nov 9, 2023

ARCHIVES

Archive
  • March 2024 5
  • February 2024 1
  • November 2023 6
  • September 2023 12
  • August 2023 6
  • September 2022 1
  • February 2021 2
  • December 2020 8
  • November 2020 9
  • October 2020 4
  • September 2020 6
  • August 2020 7
  • July 2020 3
  • May 2020 2
  • February 2020 5
  • January 2020 3
  • December 2019 3
  • November 2019 4
  • October 2019 8
  • September 2019 4
  • August 2019 2
  • July 2019 6
  • May 2019 3
  • April 2019 5
  • March 2019 2
  • February 2019 2
  • December 2018 6
  • November 2018 7
  • October 2018 5
  • July 2018 1
  • June 2018 3
  • April 2018 1
  • February 2018 2
  • January 2018 10
  • November 2017 1
  • October 2017 2
  • September 2017 2
  • August 2017 1
  • July 2017 1
  • June 2017 3
  • May 2017 1
  • March 2017 4
  • February 2017 1
  • January 2017 2
  • December 2016 4
  • November 2016 7
  • October 2016 3
  • September 2016 5
  • August 2016 2
  • July 2016 4
  • June 2016 2
  • May 2016 9
  • April 2016 7
  • March 2016 7
  • February 2016 18
  • January 2016 8
  • December 2015 10
  • November 2015 14
  • October 2015 14
  • September 2015 13
  • August 2015 5
  • July 2015 6
  • June 2015 5
  • May 2015 6
  • April 2015 5
  • March 2015 6
  • February 2015 3
  • December 2014 3
  • October 2014 7
  • September 2014 6
  • August 2014 6
  • July 2014 7
  • June 2014 6
  • May 2014 6

CATEGORIES

  • TRAVEL TALES
  • LIFESTYLE POSTS
  • RECIPES
  • ANDREA'S COOKTALES
  • QUICK BITES
  • TV APPEARANCES
  • WHAT DO YOU DO WITH THAT

BLOG     |     VIDEOS     |      SERVICES    |       RECIPE INDEX    |      PRIVACY

Copyright Andrea's Cooktales 2016-2017 | Design by Oh Simple Joys Design Studio